Installing Hydrific Droplet to Keep an Eye on Our Water Use
I installed Hydrific Droplet on our main water line, calibrated it, connected it to Home Assistant, and explored alerts and automatic shutoff options.
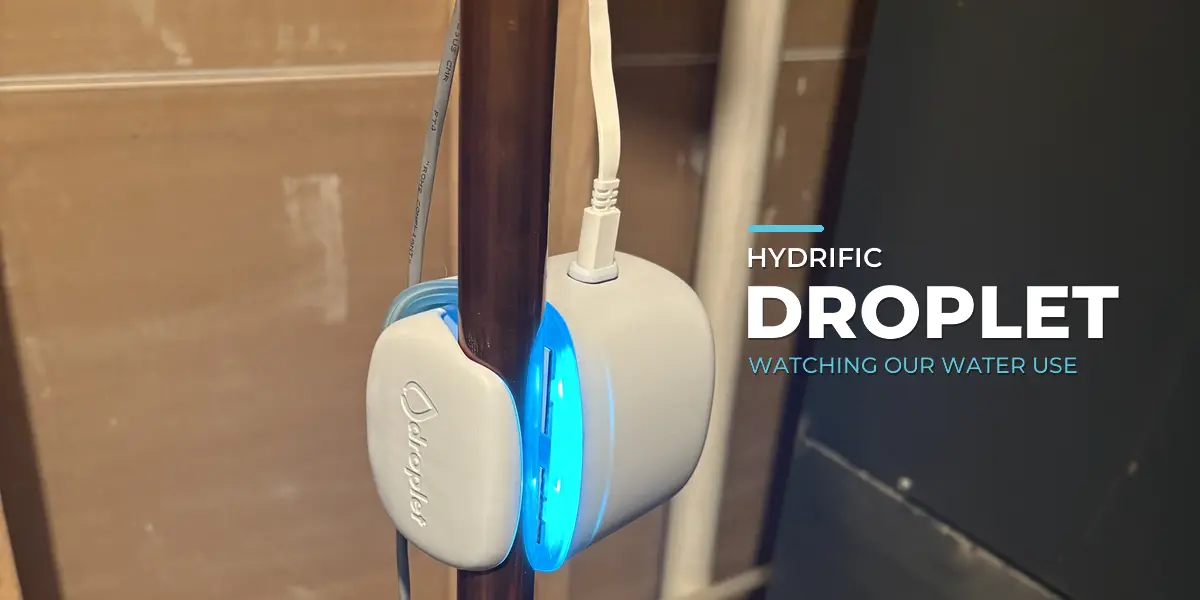
Why I wanted to watch the water
With my daughter home over the summer, I could be sitting in a meeting when she’d turn on the outdoor spigot to water, well, everything. We also had a few times when the hose was left on watering the plants for hours. I wanted a way to know when that was happening and to see our water use in real time, so I ordered the Hydrific Droplet water sensor.
Installing Droplet on the pipe
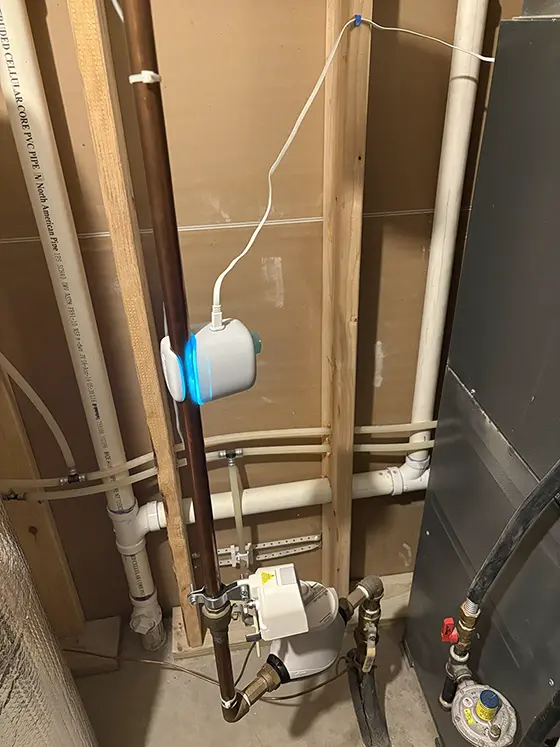
My main water line is exposed in an unfinished utility area. I chose a straight section of vertical copper pipe above my Aqara Smart Valve Controller and the city water meter.
Here’s how I installed it:
- Find a straight, unobstructed section of the main pipe near the shutoff valve. Hydrific recommends placing it before the pipe branches, with Wi-Fi and power nearby. The app says a vertical or horizontal pipe works.
- Connect the white USB-C cable at the top and power up Droplet before attaching it to the pipe.
- Fit Droplet around the pipe, with the main white body on one side and the contact piece on the other.
- Adjust the fit until the sensor holds firmly and its light turns blue. If it stays orange, the app suggests repositioning or rotating it.
My exposed copper line made the placement straightforward. Getting power there took more thought.
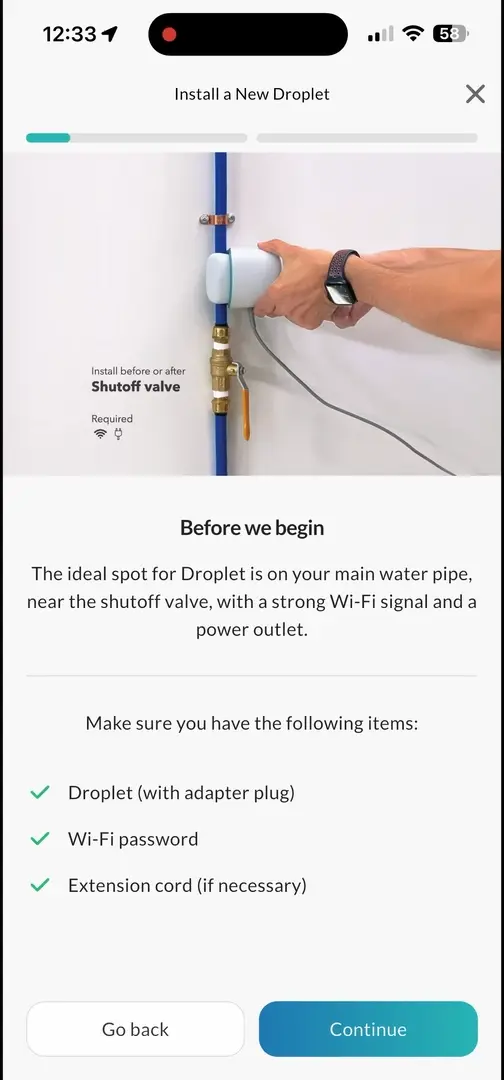
Droplet attaches to the outside of the pipe, so I did not have to cut into the line or disconnect any plumbing. Before choosing a spot in your own house, check Hydrific’s pipe compatibility and installation guidance for pipe material, size, surface, and clearance.
Powering a sensor far from the outlet
The nearest outlet I have is a fair distance from the main pipe. At first I used a longer USB-C cable intended for a Wi-Fi camera to reach it. That got the Droplet powered, but it was not the arrangement I wanted to keep.
I later changed the power setup:
- Run Cat 5 cable from my network rack to the pipe where Droplet is mounted.
- Power that run with a spare UniFi 48-volt PoE injector at the rack. I only needed power, so I did not use up a PoE switch port.
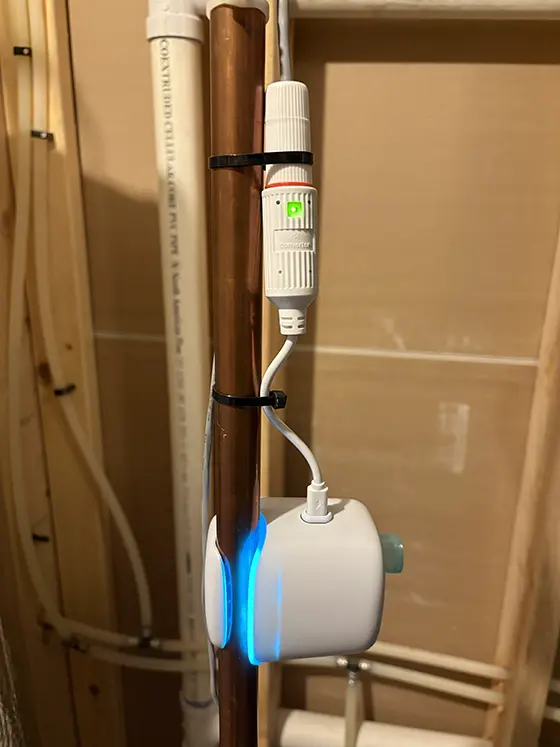
- Connect the Cat 5 run to the PoE-to-USB-C converter beside the pipe, then plug its short USB-C lead into the top of Droplet in place of the long USB cable.
- Secure the converter next to the copper pipe with cable ties.
I used a PoE-to-USB-C power converter to turn the injector’s 48-volt PoE output into 5-volt USB-C power for Droplet. That let me carry power over Cat 5 from the network rack and use a short USB-C connection at the pipe instead of the long USB cable. The adapter only supplies power; Droplet still connects over Wi-Fi. This also puts Droplet on the rack’s battery backup, so it can stay powered during an outage for as long as the backup lasts.
Pairing and using the Droplet app
Once Droplet was mounted, I finished setup in the iPhone app:
- Open Install a New Droplet and follow the placement guidance.
- Select the Droplet when the app finds it.
- Choose a Wi-Fi network, enter the password, and join. The app should report Connection established!
- Check that Droplet is firmly attached, then run pipe detection.
- Follow the app’s toilet-flush test prompt. In my setup, the app reported Pipe successfully detected and Droplet setup is now complete.
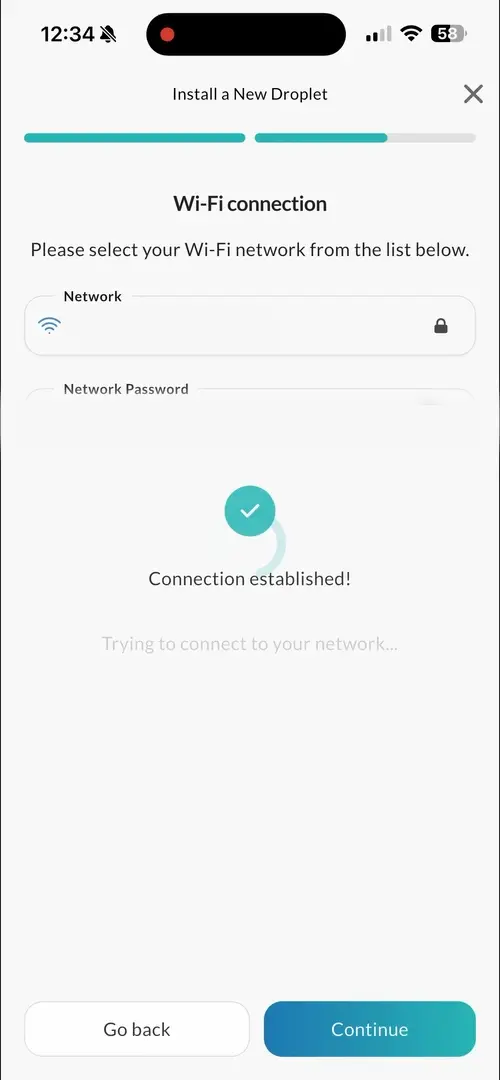
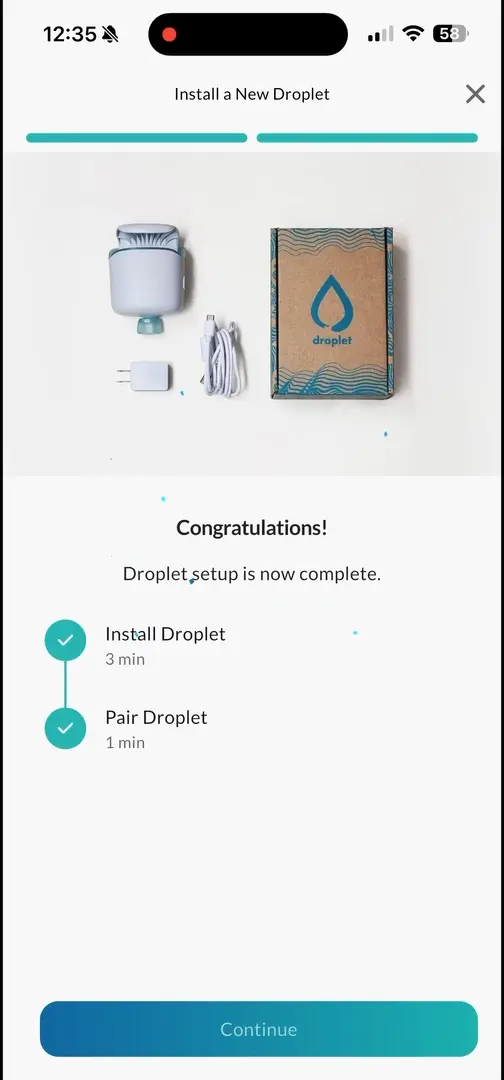
From there, the Usage view gives me a gallons gauge, a daily chart, a flow-rate readout, and Tag the running water. The container test below gave me an initial check of its readings, but I still want to compare normal water-use events before deciding what alert thresholds make sense for our house.
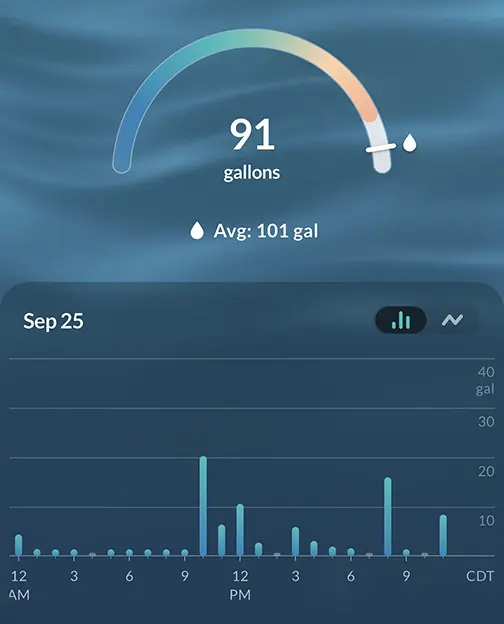 The history shown here predates this pairing, so I am not using it to judge this sensor’s measurements.
The outdoor hose is why I’m interested in Droplet’s high-flow and unusual-flow alerts. Hydrific’s alert guide describes flow-rate and duration controls under Menu > Alert Settings > High Flow Alert or Unusual Flow Alert. It also describes an alert-frequency setting. I want to compare those thresholds with normal use in our house before saying which settings work for us.
The Usage screen offers Tag the running water, though I have not tagged a hose event yet. Hydrific also documents automatic, live, and retroactive fixture tagging. That is how a water event can be assigned to an outdoor faucet, toilet, shower, or another fixture. I want to see whether tagging a hose event helps separate normal watering from the “someone forgot the hose” kind of afternoon.
The tagging feature is useful, but I have found that it is much easier to use during controlled tests than during normal family life. If I am home alone and run a faucet, flush a toilet, or use the hose, I can usually identify and tag that event without much trouble. In a house with four people, it gets harder. Someone may be filling the bathtub while someone else waters plants and I am doing dishes, so I may not know exactly which event in the app belongs to which fixture. I expect the feature to become more useful as I tag obvious events over time, but I do not expect to identify every water-use event manually.
Accuracy and calibration
I used a 0.5-gallon measuring bowl to calibrate Droplet and get its readings closer to the amount of water I was actually using. I followed Droplet’s manual calibration instructions through the app:
- Open the Droplet app and tap Menu.
- Open Droplet Settings, then Accuracy Tools.
- Choose Enhance Accuracy to start manual calibration.
- Follow the on-screen container-test steps. The instructions list 0.5 gallon, 1 gallon, or 2 liters; I used the 0.5-gallon option with my measuring bowl.
- Make sure no other water is running during the test, and fill the container to the selected volume so Droplet can measure that flow and adjust its baseline.
A household container works as long as you can measure the selected amount accurately. For my test, that meant filling the bowl to 0.50 gallon.
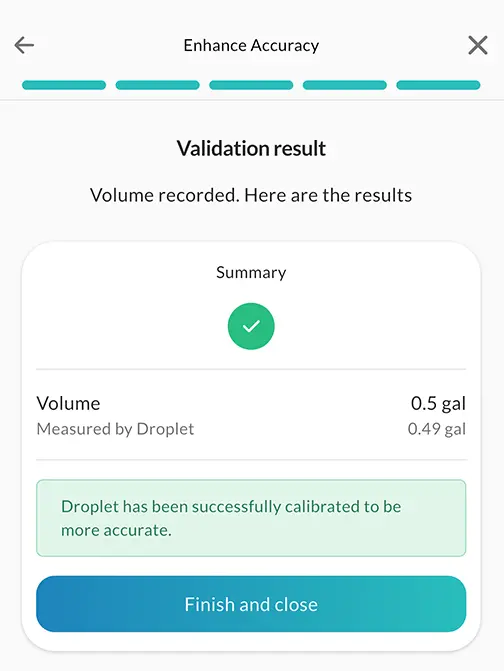
Before calibration, Droplet was reporting around 0.46 gallon for my 0.50-gallon measurement. After calibration, it reported 0.49 gallon. That brought the reading much closer to the measured amount, with a difference of 0.01 gallon in this test. It is a useful improvement in my setup, though one container test does not tell me how closely every type of water use will be measured.
Before calibrating, I also wanted to see how Droplet’s total compared with my city water bill.
I entered the bill’s start and end dates in Droplet. For those calendar dates, Droplet reported 5,641 gallons and the city bill reported 5,789 gallons. Droplet was 148 gallons lower, a difference of about 2.6% of the billed total. That was encouraging before calibration, but it is only a preliminary comparison.
I do not know what time of day the city records its meter reading on those dates. Droplet’s selected range may effectively run from midnight to midnight, while the city’s billing period could start or end at another time. That timing difference alone could account for some of the 148 gallons, so I would not call this a 2.6% accuracy result.
With the container calibration done, I still plan to get my Sensus Analytics account password reset by the city and compare Droplet with the actual meter data over shorter periods whose start and end times I can line up more closely.
Bringing Droplet into Home Assistant
I also connected Droplet to Home Assistant. Here’s the setup I used:
- In the Droplet app, open Menu > Droplet Settings > Smart Home Integrations and choose Home Assistant.
- Select the Droplet the app finds and generate a pairing code.
- In Home Assistant, open Settings > Devices & services and add the discovered Droplet.
- Enter the pairing code, name the device, and assign an area. I put mine in Utility.
Home Assistant found my Droplet without a manual search. The official Home Assistant Droplet integration documentation covers the integration if your setup looks different. Keep your pairing code out of published screenshots.
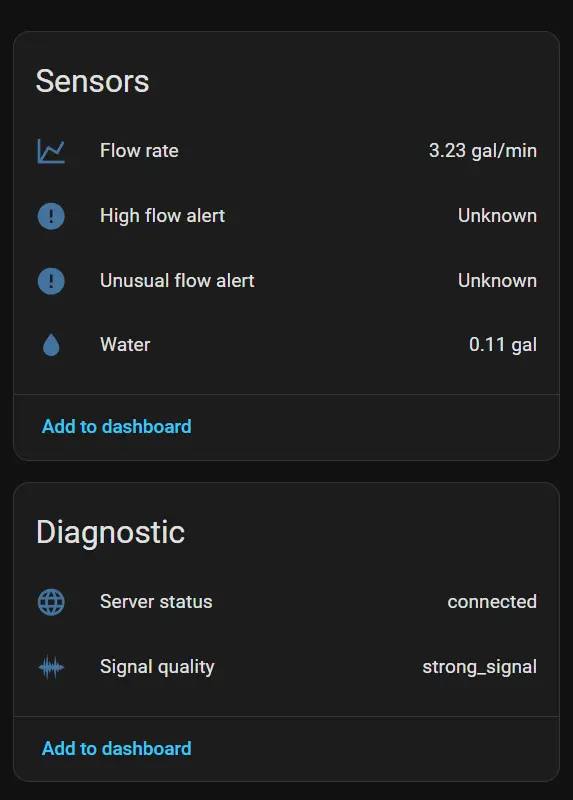
The Droplet device page now shows Flow rate in gallons per minute and Water in gallons. It also has High flow alert, Unusual flow alert, Server status, and Signal quality. The connection and signal readings populated after pairing; the alert entries showed None at that point. I have not yet seen either alert fire in my setup.
Adding Droplet to the Water dashboard
To see water use in Home Assistant’s Energy dashboard, I set up a water source:
- Open Energy > Water and select Add water source under Water consumption.
- Choose Droplet’s Water statistic for consumption.
- Select its Flow rate sensor for the optional flow-rate field and name the source Home Water.
- Choose how to track water cost and save. I entered a static water price during setup, though I still need to check it against my bill.
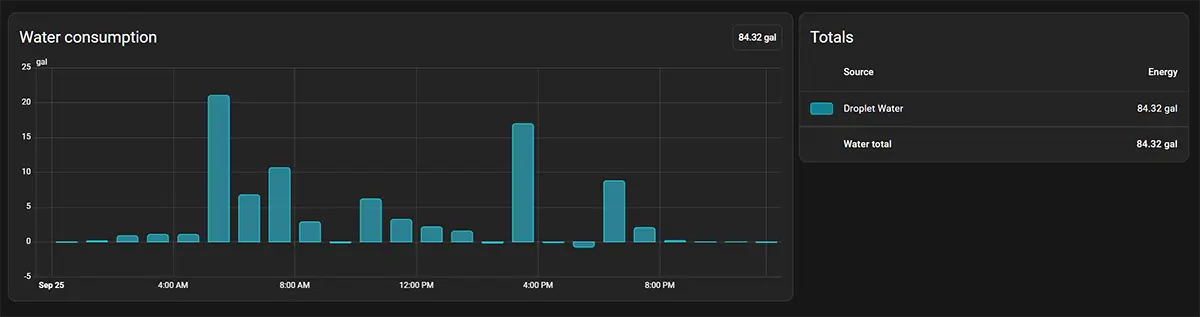
The Water page now has a consumption chart with Home Water listed as its source. I still want a known-volume water-use test before judging how closely that chart matches actual use.
Hydrific explains that Droplet’s local API reports the change in water volume since its previous update, rather than a running total. Small positive or negative readings can appear even when no fixture is running, as water moves slightly in the pipes or pressure changes. Those negative values are expected and help Home Assistant keep its cumulative water-use statistics accurate.
Home Assistant automation examples
Droplet gives Home Assistant both alert states and a live flow-rate reading. That opens up a few ways to respond to water use beyond notifications in the Droplet app.
The examples below are starting points I can build around my setup; I have not deployed every one exactly as written or verified a Droplet-triggered valve shutoff.
Relevant Droplet entities
- High flow alert binary sensor: The conditions that turn it on are set in the Droplet app’s alert settings. In Home Assistant, its state can be
on,off, orunknown. - Unusual flow alert binary sensor: Its sensitivity is also set in the Droplet app. It can likewise be
on,off, orunknownin Home Assistant. - Flow rate sensor: Reports current use in gallons per minute. I can use that reading for Home Assistant rules independent of Droplet’s built-in alert definitions.
Home Assistant’s Droplet documentation says the high-flow and unusual-flow alert statuses require a connection to Hydrific’s servers and Droplet firmware v1.4.0 or later. They are reported at least once a minute and may briefly show unknown after setup. I would check both alert entities before relying on them for an automatic shutoff.
Replace every angle-bracket placeholder below with your own full Home Assistant entity ID or number. Use a notify entity for <phone_notify_entity>; if your setup only has a phone-specific notify.mobile_app_* action, use that action instead of notify.send_message and remove its target. In my setup, <flow_threshold> is in gallons per minute; use the unit your flow-rate sensor actually reports because numeric-state triggers do not convert units. <duration> is a number of minutes. The examples assume <home_occupancy_entity> reports home or away; change those conditions if your presence setup uses other states. I would check the alert states and valve action on my own system before allowing an automatic shutoff.
Notify me about a Droplet alert while home
While we’re home, I would rather get a regular phone notification and decide whether the water use is expected. Either Droplet alert turning on can send one; the Droplet app controls what causes those alerts.
1
2
3
4
5
6
7
8
9
10
11
12
13
14
15
16
17
18
19
alias: "Droplet alert while home"
triggers:
  - trigger: state
    entity_id:
      - "<droplet_high_flow_alert>"
      - "<droplet_unusual_flow_alert>"
    to: "on"
conditions:
  - condition: state
    entity_id: "<home_occupancy_entity>"
    state: "home"
actions:
  - action: notify.send_message
    target:
      entity_id: "<phone_notify_entity>"
    data:
      title: "Droplet water alert"
      message: "{{ trigger.to_state.name }} turned on. Check whether the water use is expected."
mode: single
Shut off the water if Droplet alerts while away
If the house is marked away, I could have either Droplet alert send me a notification and close the main valve. The notification names the alert that fired. This is a much bigger response than a phone alert, so I would choose the Droplet app’s alert settings with normal outdoor use in mind.
1
2
3
4
5
6
7
8
9
10
11
12
13
14
15
16
17
18
19
20
21
22
23
alias: "Droplet alert shutoff while away"
triggers:
  - trigger: state
    entity_id:
      - "<droplet_high_flow_alert>"
      - "<droplet_unusual_flow_alert>"
    to: "on"
conditions:
  - condition: state
    entity_id: "<home_occupancy_entity>"
    state: "away"
actions:
  - action: notify.send_message
    continue_on_error: true
    target:
      entity_id: "<phone_notify_entity>"
    data:
      title: "Closing the main water valve"
      message: "{{ trigger.to_state.name }} turned on while the house was away. Closing the water valve."
  - action: valve.close_valve
    target:
      entity_id: "<main_water_valve>"
mode: single
This uses Home Assistant’s valve.close_valve action. A notification delivery error should not stop the valve action because the notification step has continue_on_error: true; configuration errors still need fixing. My Aqara Smart Valve Controller setup exposes the shutoff as a switch, so that setup would need switch.turn_off and the appropriate switch entity instead. I have not verified the Droplet-to-valve combination yet.
Combine Droplet alerts and leak sensors while away
My leak sensors can catch water where they sit. Droplet could catch unusual use elsewhere, even without a leak sensor nearby. Home Assistant can watch both and close the main valve when the house is away.
1
2
3
4
5
6
7
8
9
10
11
12
13
14
15
16
17
18
19
20
21
22
23
24
25
alias: "Water alert shutoff while away"
triggers:
  - trigger: state
    entity_id:
      - "<droplet_high_flow_alert>"
      - "<droplet_unusual_flow_alert>"
      - "<leak_sensor_1>"
      - "<leak_sensor_2>"
    to: "on"
conditions:
  - condition: state
    entity_id: "<home_occupancy_entity>"
    state: "away"
actions:
  - action: notify.send_message
    continue_on_error: true
    target:
      entity_id: "<phone_notify_entity>"
    data:
      title: "Closing the main water valve"
      message: "{{ trigger.to_state.name }} turned on while the house was away. Closing the water valve."
  - action: valve.close_valve
    target:
      entity_id: "<main_water_valve>"
mode: single
Replace the two leak-sensor placeholders with the sensors you actually have, or remove one if you only have one. A leak sensor must report on when it detects water for this version to work. The valve action needs the same switch adjustment for my Aqara controller.
Notify me about sustained water flow
A hose, sprinkler, or outdoor faucet left running is exactly the kind of event I want to catch. A flow-rate rule could notify me when water stays above a chosen rate for a chosen time, without closing the valve. I plan to look at our normal showers, watering, and other use before choosing values that won’t send routine false alarms.
1
2
3
4
5
6
7
8
9
10
11
12
13
14
15
alias: "Droplet sustained flow notification"
triggers:
  - trigger: numeric_state
    entity_id: "<droplet_flow_rate>"
    above: <flow_threshold>
    for:
      minutes: <duration>
actions:
  - action: notify.send_message
    target:
      entity_id: "<phone_notify_entity>"
    data:
      title: "Water is still running"
      message: "Droplet has reported sustained water flow. Check whether it is intentional."
mode: single
My flow-rate sensor reports gallons per minute. Home Assistant’s numeric-state trigger fires when the reading crosses the threshold and stays above it for the selected duration; it will not keep notifying while the reading remains above that threshold. A pending for timer resets if Home Assistant restarts or automations reload, which also applies to the shutoff example below. There is no single rate or duration that fits every house.
Make automatic shutoff more conservative
For an automatic shutoff, I could require the house to be away and either a leak sensor to detect water or Droplet’s flow rate to remain high for a set time while one of its alerts is on. That extra Droplet condition makes a long but ordinary water-use event less likely to close the valve. This example uses trigger IDs so the notification can explain which path caused the shutoff.
1
2
3
4
5
6
7
8
9
10
11
12
13
14
15
16
17
18
19
20
21
22
23
24
25
26
27
28
29
30
31
32
33
34
35
36
37
38
39
40
41
42
43
44
45
46
47
48
49
50
51
52
53
54
55
56
57
alias: "Conservative water shutoff while away"
triggers:
  - trigger: state
    entity_id:
      - "<leak_sensor_1>"
      - "<leak_sensor_2>"
    to: "on"
    id: leak
  - trigger: numeric_state
    entity_id: "<droplet_flow_rate>"
    above: <flow_threshold>
    for:
      minutes: <duration>
    id: sustained_flow
conditions:
  - condition: state
    entity_id: "<home_occupancy_entity>"
    state: "away"
actions:
  - choose:
      - conditions:
          - condition: trigger
            id: leak
        sequence:
          - action: notify.send_message
            continue_on_error: true
            target:
              entity_id: "<phone_notify_entity>"
            data:
              title: "Closing the main water valve"
              message: "{{ trigger.to_state.name }} detected water while the house was away."
          - action: valve.close_valve
            target:
              entity_id: "<main_water_valve>"
      - conditions:
          - condition: trigger
            id: sustained_flow
          - condition: or
            conditions:
              - condition: state
                entity_id: "<droplet_high_flow_alert>"
                state: "on"
              - condition: state
                entity_id: "<droplet_unusual_flow_alert>"
                state: "on"
        sequence:
          - action: notify.send_message
            continue_on_error: true
            target:
              entity_id: "<phone_notify_entity>"
            data:
              title: "Closing the main water valve"
              message: "Droplet reported sustained flow and an active alert while the house was away."
          - action: valve.close_valve
            target:
              entity_id: "<main_water_valve>"
mode: single
For my switch-based Aqara valve, I would change both close actions to switch.turn_off. This version checks for an active Droplet alert when the sustained-flow trigger fires; an alert that comes on later will not cause a shutoff until the flow drops and crosses the threshold again. I would choose the flow threshold and duration based on our own usage, and verify the leak and Droplet alert behavior before trusting this with the main valve.
Resources in This Post
ChrisHansenTech is a participant in the Amazon Services LLC Associates Program, an affiliate advertising program designed to provide a means for sites to earn advertising fees by advertising and linking to Amazon.com. As an Amazon Associate I earn from qualifying purchases.
Hardware
- Hydrific Droplet
- Longer USB-C cable
- Cat 5e cable 500ft
- Power-only PoE-to-USB-C converter
- UniFi 48-volt PoE injector
- Aqara Smart Valve Controller
Final Thoughts
So far, Droplet has been a nice addition to my Home Assistant setup. Installation itself was straightforward, but the location of my water main made powering it the more interesting part of the project. Using PoE from my battery-backed network rack ended up being a cleaner solution than trying to route USB power from the nearest outlet, and it gives the sensor a reliable power source along with the rest of my network equipment.
I also like that Droplet works perfectly well on its own while still giving me the option to bring its sensors into Home Assistant. For now, I am mainly using the Droplet app for the detailed water usage information and Home Assistant for visibility and alerts rather than trying to recreate everything the app already does well.
The next step is simply letting it collect more real-world data. I want to see how accurately it identifies things like showers, toilets, appliances, and outdoor watering, and how useful its high-flow and unusual-flow alerts are over time. From there, I can decide whether it makes sense to tie those alerts into my Aqara main water valve or add any additional Home Assistant automations.
Like most of my smart home projects, I would rather start with good information and notifications first, then automate the response once I know what normal actually looks like.
Frequently Asked Questions
Did I have to cut into the water line?
No. Droplet clamps onto the outside of my exposed copper main line; I did not have to cut or disconnect the pipe.
How did I know app setup completed?
The app confirmed my Wi-Fi connection, completed pipe detection, advanced through its flow-validation step, and showed Droplet setup is now complete. The city-bill comparison is encouraging, but I still need a more precise check of the readings.
Can Droplet shut off my water by itself?
Droplet handles monitoring and alerts; automatic shutoff would need a separate controller. My Aqara valve controller post covers that device, but I have not tested a combined Droplet-and-valve automation.
Why does Droplet show small negative water readings in Home Assistant?
Hydrific explains that Droplet’s local API reports the change in volume since the previous update. Small movements in the pipes or pressure changes can produce positive or negative readings even when no fixture is running. The negative values are expected and help Home Assistant calculate cumulative water use accurately.
Want to share your thoughts or ask a question?
This blog runs on coffee, YAML, and the occasional dad joke.
If you’ve found a post helpful, you can
support my work or
☕ buy me a coffee.
Curious about the gear I use? Check out my smart home and homelab setup.