Using the UniFi G4 Doorbell Pro NFC and Fingerprint with Home Assistant
Automate UniFi Protect alarms with Home Assistant using webhooks for doorbell, motion, and line-crossing events. Learn how to trigger notifications, actions, and even send commands back to Protect.
Introduction
This post continues my UniFi G4 Doorbell Pro and Home Assistant series. In Part 3, we’ll dive into how to use the NFC and Fingerprint features of the UniFi G4 Doorbell Pro in Home Assistant.
In Part 1, I shared my experience living with the G4 Doorbell Pro after 18 months of use and how it integrates with Home Assistant for basic monitoring and LCD message control. In Part 2 I covered how to use UniFi Protect webhooks to trigger automations in Home Assistant
This follow-up covers the NFC and fingerprint readers on the doorbell and how to use them in your Home Assistant setup.
Resources in This Post
ChrisHansenTech is a participant in the Amazon Services LLC Associates Program, an affiliate advertising program designed to provide a means for sites to earn advertising fees by advertising and linking to Amazon.com. As an Amazon Associate I earn from qualifying purchases.
Hardware
- UniFi G4 Doorbell Pro PoE Kit
- UniFi Dream Machine Special Edition
- NTAG215 Key Fobs
- NTAG215 Cards
- Flipper Zero
Software and Services
- Webhook.site - Service to send webhooks to for testing and to see the payload.
NFC - What the doorbell reads and why that Matters
The UniFi G4 Doorbell Pro reads the unique ID stored on the NFC chip. In practical terms that means that it will work with basically and NFC tag, card, or fob such as:
- NTAG215
- MIFARE Classic
- A credit or debit card with an NFC chip
- Generic NFC key fobs and stickers
Since only the unique ID is read from the NFC chip, and it isn’t encrypted, tags can be easily cloned using devices like the Flipper Zero. More on that later. 😈
Add an NFC tag in UniFi Protect
You can use either the UniFi Protect web app or the mobile app to add an NFC tag.
Examples are based on UniFi Protect 6.1.78 and UniFi OS 4.3.6 running on a UniFi
Dream Machine SE with the UniFi Protect iPhone app. Your interface may differ
slightly depending on your software versions.
Web app
- Sign in to UniFi Protect.
- Select the doorbell camera from the dashboard.
- Select Settings (gear icon).
- Scroll down and select Add new card.
- Hold the NFC card or tag near the doorbell.
- Select the UniFi user to assign the tag to.
- Click Add
iPhone app
- Open the UniFi Protect app.
- Select the doorbell camera →
- Select Settings (gear icon).
- Select Camera Settings → NFC Cards → Add new card.
- Hold the NFC card or tag near the doorbell when prompted.
- Select the UniFi user to assign the tag to.
- Select Save → Done
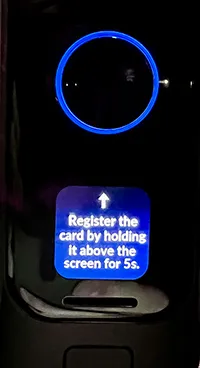 UniFi Doorbell G4 Pro prompting to register NFC
Add Fingerprints in UniFi Protect
You can use either the UniFi Protect web app or the mobile app to add fingerprints.
Web app
- Sign in to UniFi Protect.
- Select the doorbell camera from the dashboard.
- Select Settings (gear icon).
- Scroll down and select Add new fingerprint.
- Place your finger on the fingerprint reader (the rectangle at the bottom of the doorbell).
- Repeat until it registers your finger print.
- Select the UniFi user to assign.
- Select Add
iPhone app
- Open the UniFi Protect app.
- Select the doorbell camera →
- Select Settings (gear icon).
- Select Camera Settings → Fingerprints → Add new fingerprint.
- Place your finger on the fingerprint reader (the rectangle at the bottom of the doorbell).
- Repeat until it registers your finger print.
- Select the UniFi user to assign the fingerprint to.
- Select Save → Done
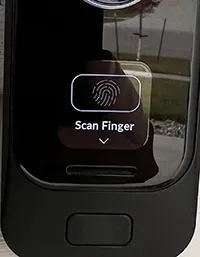 UniFi G4 Doorbell Pro prompting to register fingerprint
Retrieving the UniFi User GUID
To link Home Assistant automations with the correct user, you’ll need to find the UniFi user GUID. This identifier lets you match events from the UniFi Protect integration or Protect Alarm webhooks to a specific user.
- Log in to UniFi Protect.
- Select Admins & Users.
- Select the user you want to identify.
- Look for the GUID in the page URL:
https://[YOUR_UNIFI_DEVICE_ADDRESS]/protect/admins/[USER_ID_GUID]/overview
UniFi Protect Home Assistant integration automations
The UniFi Protect integration provides access to NFC and fingerprint event entities that can be used to trigger automations in Home Assistant.
When creating NFC or fingerprint automations, include additional conditions to prevent them from running after Home Assistant restarts. This avoids accidental triggers caused by restored entity states, which may still reflect the last detected NFC or fingerprint scan.
NFC Automation
1
2
3
4
5
6
7
8
9
10
11
12
13
14
15
16
17
18
19
20
21
22
23
24
alias: Doorbell NFC Scan
description: "Unlock the front door when NFC tag scanned"
triggers:
  - trigger: event
    event_type: state_changed
    event_data:
      entity_id: event.front_door_nfc
conditions:
  - condition: template
    value_template: |-
      {{
        not trigger.event.data.old_state.attributes.get("restored", false) and
        not trigger.event.data.old_state.state == "unavailable" and
        trigger.event.data.new_state is not none and
        trigger.event.data.new_state.attributes.event_type == "scanned" and
        trigger.event.data.new_state.attributes.ulp_id in ["[PLACEHOLDER_USER_GUIDs]"]
      }}
actions:
  - action: lock.unlock
    metadata: {}
    data: {}
    target:
      entity_id: lock.aqara_smart_lock_u100
mode: single
Fingerprint Automation
1
2
3
4
5
6
7
8
9
10
11
12
13
14
15
16
17
18
19
20
21
22
23
24
alias: Doorbell Fingerprint Scan
description: "Unlock the front door when fingerprint scanned"
triggers:
  - trigger: event
    event_type: state_changed
    event_data:
      entity_id: event.front_door_nfc
conditions:
  - condition: template
    value_template: |-
      {{
        not trigger.event.data.old_state.attributes.get("restored", false) and
        not trigger.event.data.old_state.state == "unavailable" and
        trigger.event.data.new_state is not none and
        trigger.event.data.new_state.attributes.event_type == 'identified' and
        trigger.event.data.new_state.attributes.ulp_id in ["[PLACEHOLDER_USER_GUIDs]"]
      }}
actions:
  - action: lock.unlock
    metadata: {}
    data: {}
    target:
      entity_id: lock.aqara_smart_lock_u100
mode: single
UniFi Protect Webhook Home Assistant Automations
Using our knowledge on UniFi Protect alarm webhooks and automations from part 2 of this series we can use NFC tags and fingerprint reads to trigger automations in Home Assistant.
NFC Webhook Automation
First, we need to create an alarm in UniFi Protect to trigger when an NFC tag
is detected.
- Open UniFi Protect.
- Select Alarm Manager → Create Alarm.
- Type Home Assistant NFC for the alarm name.
- Select Activity.
- Check NFC Card Scan.
- Select the activity types. I usually select Registered NFC Card
- In Scope, select your doorbell device.
- In Action, click Webhook.
- Change the default Slack Post to Custom Webhook.
- In Delivery URL, enter your Home Assistant webhook address:
http://[your_home_assistant]:8123/api/webhook/[your_hook_id]
- Under Advanced Settings, select POST.
- Select Create to save the new alarm.
This webhook payload is sent whenever the doorbell detects a registered NFC card:
1
2
3
4
5
6
7
8
9
10
11
12
13
14
15
16
17
18
19
20
21
22
23
24
25
26
27
28
29
{
  "alarm": {
    "name": "Home Assistant NFC Tag",
    "sources": [
      {
        "device": "[DEVICE_MAC_ADDRESS]",
        "type": "include"
      }
    ],
    "conditions": [
      {
        "condition": {
          "type": "is",
          "source": "nfc_registered",
        }
      }
    ],
    "triggers": [
      {
        "key": "nfc_registered",
        "device": "[DEVICE_MAC_ADDRESS}",
        "value": "[USER_ID_GUID]",
        "eventId": "[EVENT_ID]",
        "timestamp": 1760789597374
      }
    ]
  },
  "timestamp": 1760789597402
}
For the Home Assistant automation, we will use the webhook payload to verify
the user and then unlock the front door.
1
2
3
4
5
6
7
8
9
10
11
12
13
14
15
16
17
18
19
20
21
22
23
alias: NFC Webhook
description: "Unlock the front door using NFC webhook"
triggers:
  - trigger: webhook
    allowed_methods:
      - POST
    local_only: true
    webhook_id: "[PLACEHOLDER_WEBHOOK_ID]"
conditions:
  - condition: template
    value_template: |-
      {{ trigger.json.alarm.sources[0].device == "[PLACEHOLDER_DEVICE_MAC]" and
       trigger.json.alarm.triggers[0].key == "nfc_registered" and
       trigger.json.alarm.triggers[0].value in ["[PLACEHOLDER_USER_GUIDs]"]
      }}
actions:
  - action: lock.unlock
    metadata: {}
    data: {}
    target:
      entity_id: lock.[PLACEHOLDER_LOCK_ENTITY_ID]
mode: single
Fingerprint Webhook Automation
First, we need to create an alarm in UniFi Protect to trigger when an NFC tag
is detected.
- Open UniFi Protect.
- Select Alarm Manager → Create Alarm.
- Type Home Assistant Fingerprint for the alarm name.
- Select Activity.
- Check Fingerprint Scan.
- Select the activity types. I usually select Registered Fingerprint
- In Scope, select your doorbell device.
- In Action, click Webhook.
- Change the default Slack Post to Custom Webhook.
- In Delivery URL, enter your Home Assistant webhook address:
http://[your_home_assistant]:8123/api/webhook/[your_hook_id]
- Under Advanced Settings, select POST.
- Select Create to save the new alarm.
This webhook payload is sent whenever the doorbell detects a registered NFC card:
1
2
3
4
5
6
7
8
9
10
11
12
13
14
15
16
17
18
19
20
21
22
23
24
25
26
27
28
29
{
  "alarm": {
    "name": "Fingerprint",
    "sources": [
      {
        "device": "[DEVICE_MAC_ADDRESS]",
        "type": "include"
      }
    ],
    "conditions": [
      {
        "condition": {
          "type": "is",
          "source": "fingerprint_registered",
        }
      }
    ],
    "triggers": [
      {
        "key": "fingerprint_registered",
        "device": "[DEVICE_MAC_ADDRESS}",
        "value": "[USER_ID_GUID]",
        "eventId": "[EVENT_ID]",
        "timestamp": 1760789597374
      }
    ]
  },
  "timestamp": 1760789597402
}
For the Home Assistant automation, we will use the webhook payload to verify
the user and then unlock the front door.
1
2
3
4
5
6
7
8
9
10
11
12
13
14
15
16
17
18
19
20
21
22
23
alias: Fingerprint Webhook
description: "Unlock the front door using fingerprint webhook"
triggers:
  - trigger: webhook
    allowed_methods:
      - POST
    local_only: true
    webhook_id: "[PLACEHOLDER_WEBHOOK_ID]"
conditions:
  - condition: template
    value_template: |-
      {{ trigger.json.alarm.sources[0].device == "[PLACEHOLDER_DEVICE_MAC]" and
       trigger.json.alarm.triggers[0].key == "fingerprint_registered" and
       trigger.json.alarm.triggers[0].value in ["[PLACEHOLDER_USER_GUIDs]"]
      }}
actions:
  - action: lock.unlock
    metadata: {}
    data: {}
    target:
      entity_id: lock.[PLACEHOLDER_LOCK_ENTITY_ID]
mode: single
NFC security
UniFi Protect only checks the NFC chip’s unique ID. It treats that number like a name on a list—if it matches, it’s accepted. That makes NFC convenient but not particularly secure.
In practice, the doorbell just reads the UID and compares it to the registered list. Because that UID is public, anyone with a cheap reader or a Flipper Zero can copy it. In my video, I show how easy it is to read a tag with a Flipper Zero and emulate it on the doorbell. The system can’t tell the difference.
The Aqara U100 lock I wrote about takes a stronger approach. It uses MiFare Classic style sectors and keys instead of relying only on the UID. To clone one of those tags, you’d need both the keys from the lock and the tag itself. The U100 also limits attempts, so trying to brute-force keys takes time and usually causes the lock to error out. It’s not perfect security, but it’s far better than UID-only systems. (See my Aqara U100 post for details.)
I’m not going to post step-by-step instructions for cloning tags or extracting keys—this is about awareness, not exploitation. The goal is to understand how these systems work so you can make better decisions.
Key takeaways:
- Treat UID-only NFC as convenience, not authentication.
- Add a secondary check when possible, like a push notification before unlocking.
- Use locks that support cryptographic NFC or mutual authentication.
- Monitor logs and enable notifications for unusual activity.
- Keep firmware updated and disable NFC if you don’t use it.
Demo: Reading a registered NFC tag with a Flipper Zero
Wrapping up
It’s easy to get caught up in what’s possible with smart home tech and forget to ask what’s practical—or secure. The NFC and fingerprint features on the UniFi G4 Doorbell Pro are a perfect example. They’re fast, simple, and fun to automate, but they come with trade-offs that are worth understanding.
For most people, pairing these features with Home Assistant adds convenience that feels futuristic. Just remember to balance that with basic safeguards—notifications, logging, and a healthy respect for what an exposed UID can do.
In the next part, I’ll take things a step further and show how to upload custom animations and sounds to the doorbell using SFTP. It’s a small touch that makes the G4 feel a lot more personal.
Related posts in this series
- Part 1: Living with the UniFi G4 Doorbell Pro
- Part 2: Automating UniFi Protect Alarms and Webhooks
- Part 3: NFC and Fingerprint Access with Home Assistant (you are here)
- Part 4: Custom Animations and Sounds with Home Assistant
- Part 5: Doorbell MQTT UniFi - Full setup guide
Want to share your thoughts or ask a question?
This blog runs on coffee, YAML, and the occasional dad joke.
If you’ve found a post helpful, you can
support my work or
☕ buy me a coffee.
Curious about the gear I use? Check out my smart home and homelab setup.