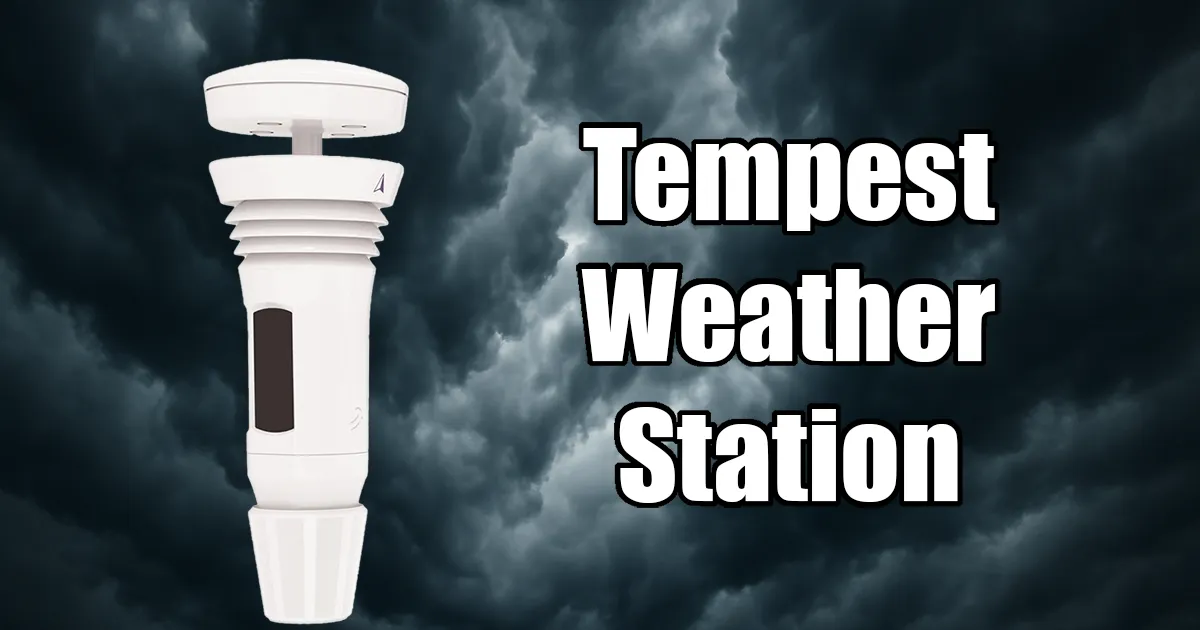
Using the Tempest Weather Station in Home Assistant
Learn how to use the Tempest Weather Station with Home Assistant for local data, dashboards, and smart automations like rain and lightning alerts.
I’ve always been interested in weather data, so I thought having a personal weather station like the Tempest in my back yard would be interesting. I was right, having a live ultra local version of the weather data I rely on every day has been wonderful.
Before I had the Tempest weather station I used AccuWeather on my phone and the AccuWeather integration in Home Assistant. These worked well, but the way AccuWeather keeps adding fees I was getting over it. I had already purchased the premium version of the app, then I needed a subscription to get newer features, the API is very limited on the free version that is now going away as well and cost $2 a month for the starter API plan. It was time for a change.
Resources for This Project
ChrisHansenTech is a participant in the Amazon Services LLC Associates Program, an affiliate advertising program designed to provide a means for sites to earn advertising fees by advertising and linking to Amazon.com. As an Amazon Associate I earn from qualifying purchases. This post may also contain affiliate links from Tempest Ambassador . As a participant in these programs, I may earn from qualifying purchases, at no additional cost to you.
- Tempest Weather System
- Buy direct from Tempest (use coupon code CHT10 at checkout)
- Buy on Amazon
I purchased my Tempest with my own money and use it daily in my smart home.
Hardware and the Tempest app
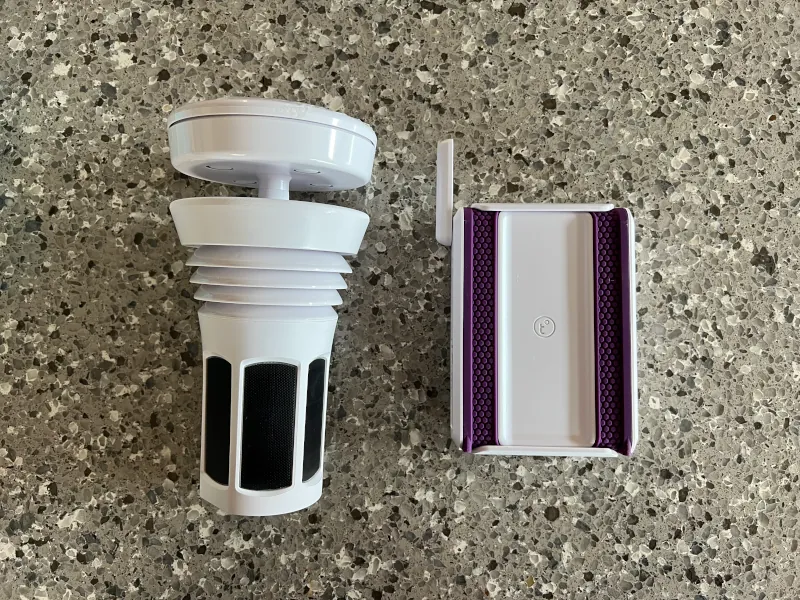 Tempest Hardware
After unboxing I installed the iPhone App and it does a great job of walking you through setting up the hub, connecting it to your WiFi, and it will also give suggestions on mounting.
Mounting is simple since Tempest has no cups or moving parts and runs on a built-in solar cell. Here is what I did, plus an alternate fence option.
1 - Pick a good location
- Prioritize open sky and clean wind. Avoid overhangs and large trees.
- Height helps for wind. I chose the roof of my girls’ wooden swing set.
- A fence post can work, but wind readings may be lower at that height.
- Keep it level. The haptic rain sensor expects a plumb mount.
2 - Mount the Tempest
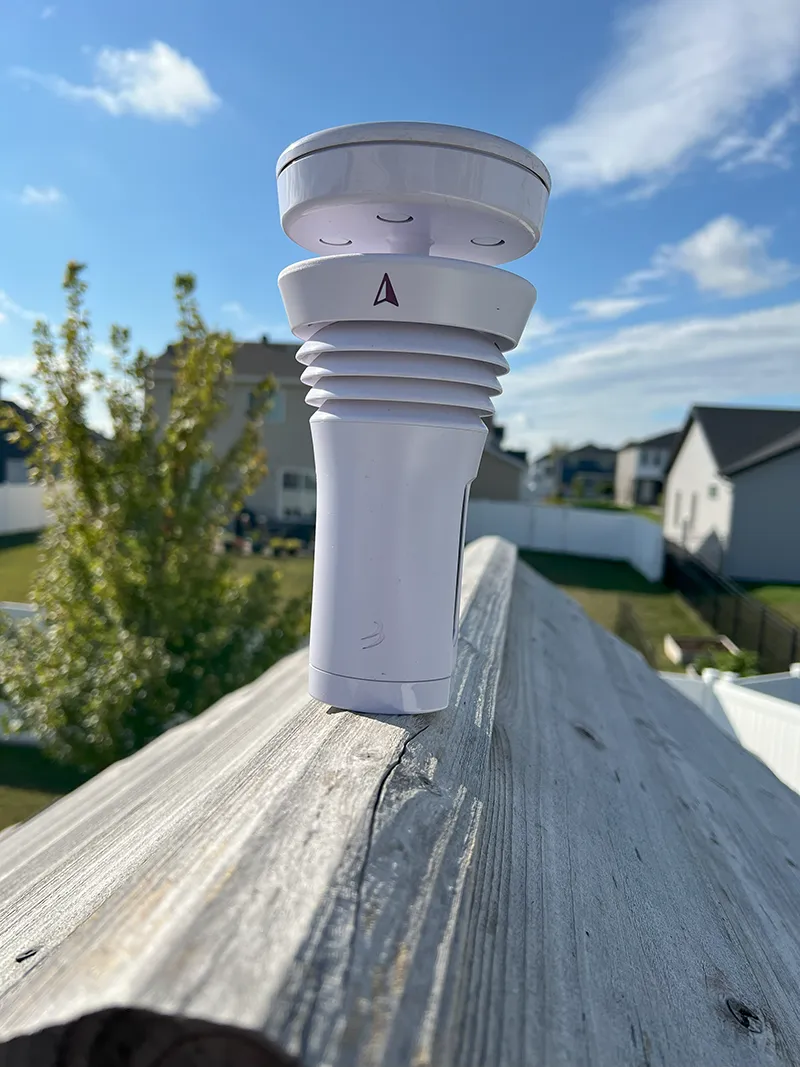 Tempest Mounted Closeup
- Use a sturdy pole or the swing set roof edge.
- Make sure the mount cannot wobble. Tighten all fasteners.
- Level the unit using a small bubble level.
- Pro tip: if you can flex the mounting surface by hand, add bracing.
When I was looking at older information about the Tempest it mentioned vibrations causing false positives on the haptic sensor. However, this must have been improved with firmware updates as I have never seen any false positives when my kids play on the swing set. The only way I could get it to register a false positive was by hitting the roof of the swing set near where I mounted the Tempest.
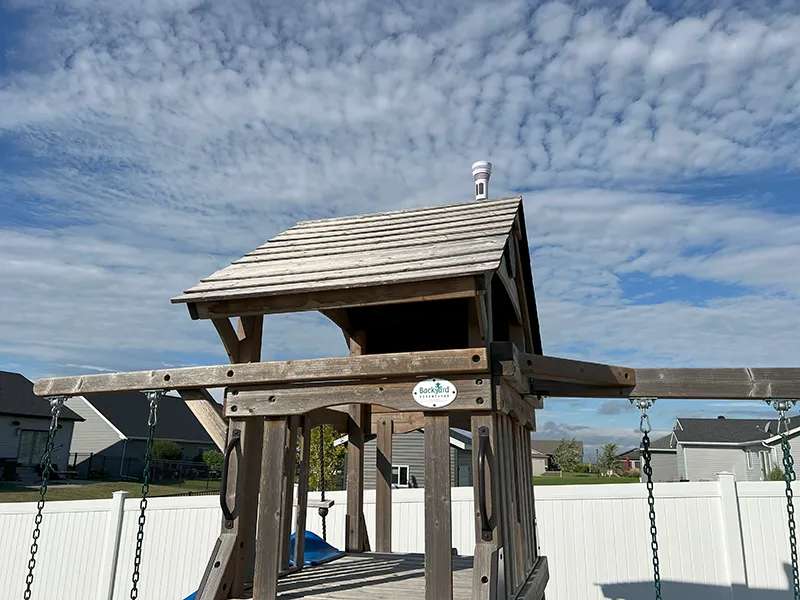 Tempest Final Mount
Local integration with Home Assistant
- Home Assistant and the Tempest Hub must be on the same LAN.
- Multicast/UDP broadcast must not be blocked by your router.
When you open the Devices and Services page in Home Assistant the Tempest might get discovered automatically. If it doesn’t you can manually add the integration.
- Click + Add Integration
- Search for and select WeatherFlow
- Select WeatherFlow
You will see a waiting popup while it detects your hub on the network. You will then be promtped to name the device and select an area for your WeatherStation and Hub. Click Skip and Finish if you are not making any changes or Finish if you did make changes.
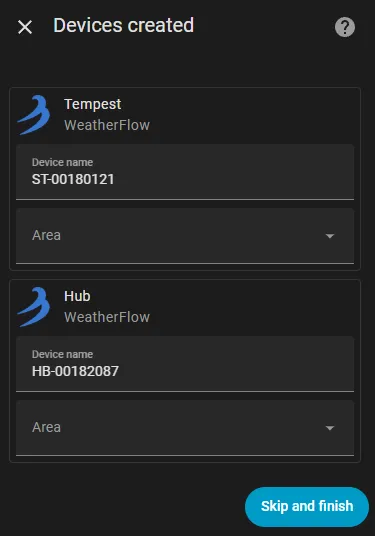 Home Assistant WeatherFlow Devices Created
The hub device only contains two entities that by default are disabled: Signal strength and Uptime. The Tempest station device contains 25 entities and is where all the weather entities are.
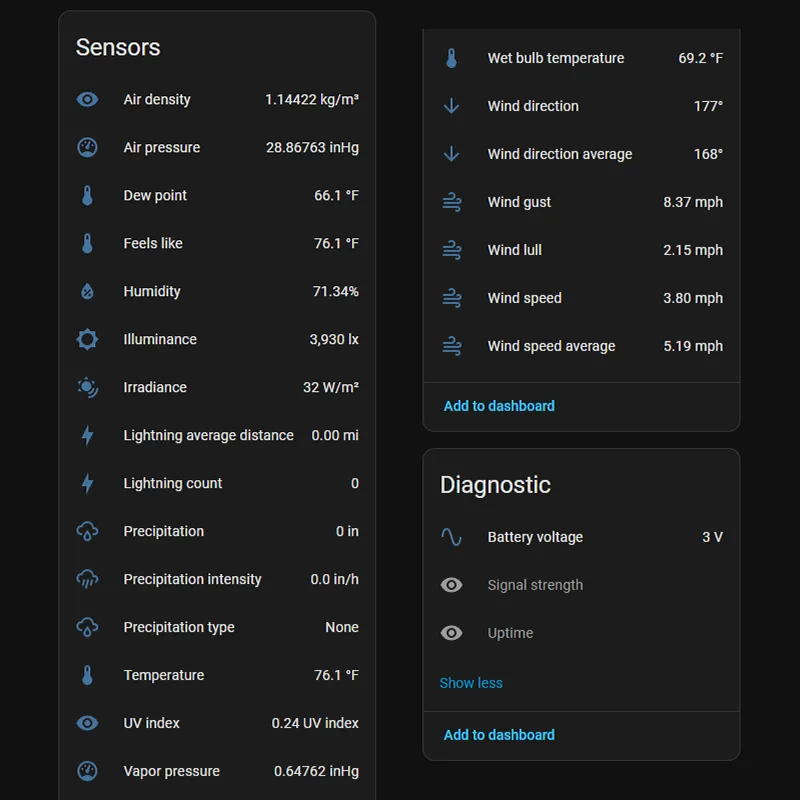 All 25 Tempest Entities
Cloud integration for forecast data
The WeatherFlow cloud integration will give you access to all the forecast information. The readings might not be the exact same as your personal Tempest weather station because it combines the data with other nearby stations and weather sources.
The first thing you will need is an API key.
- Open the TempestWx website
- Login using your Tempest account
- Click My Station
- Click Settings
- Click Data Authorizations
- Click Create Token
- Type in a Name for your token
- Click Copy to copy the token to your clipboard
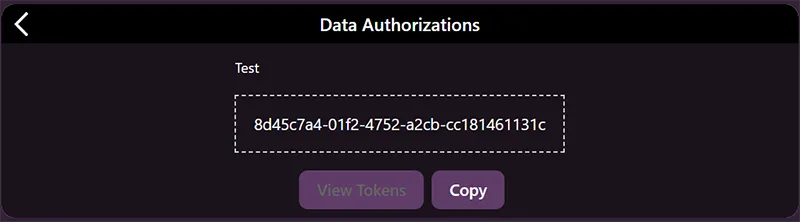 Tempest Wx Token
Don’t worry I deleted that token so it is not valid.
Next we will setup the WeatherFlow Cloud integration in Home Assistant
- In the Devices and Services page click + Add Integration
- Search for WeatherFlow
- Click WeatherFlow
- Click WeatherFlow Cloud
- Paste your Personal API Token
- Click Submit
- Click **Finish
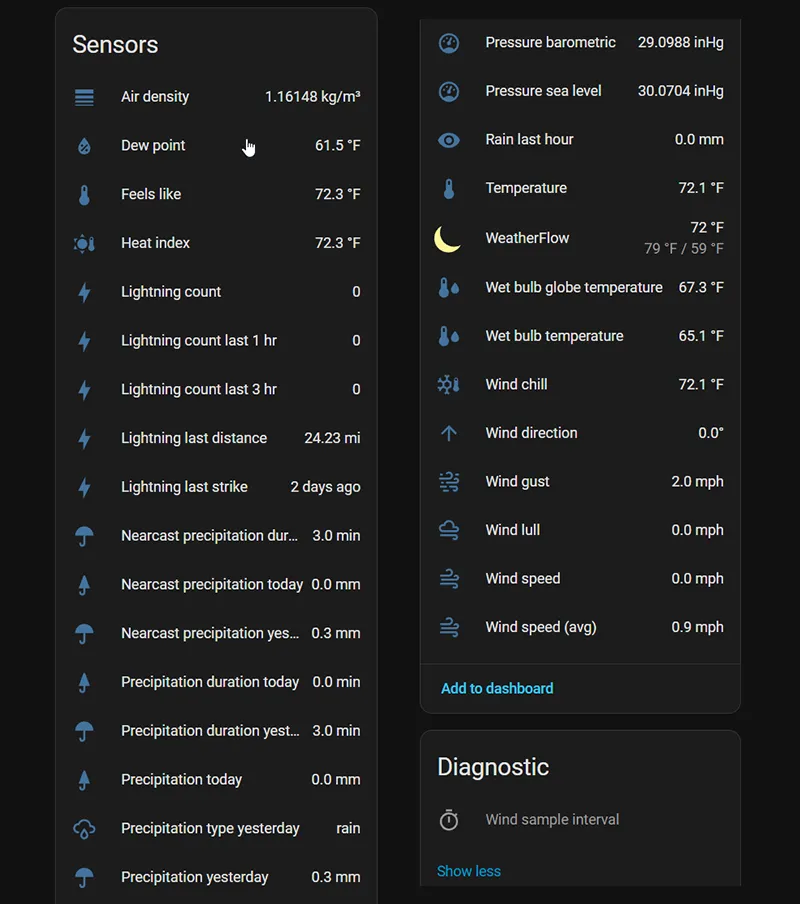 WeatherFlow Cloud Home Assistant Entities
Home Assistant Dashboard
To display the weather on my dashboards I really like the Clock Weather Card in HACS. I used this card in my RaspberryPI desktop dashboard project and updated it to use my Tempest weather station and Tempest cloud forecast data.
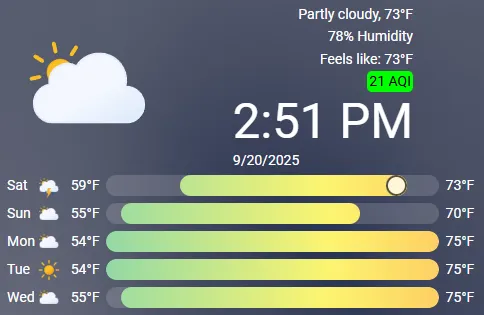 Clock Weather Card
The YAML for the card.
1
2
3
4
5
6
7
8
9
type: custom:clock-weather-card
entity: weather.[PLACEHOLDER_WEATHER_ENTITY]
animated_icon: true
weather_icon_type: fill
temperature_sensor: sensor.[PLACEHOLDER_TEMPERATURE]
apparent_sensor: sensor.[PLACEHOLDER_FEELS_LIKE]
humidity_sensor: sensor.[PLACEHOLDER_HUMIDITY]
aqi_sensor: sensor.[PLACEHOLDER_AIR_QUALITY]
show_humidity: true
Automations and scripts
The most common automation I see with the Tempest is assisting the lawn irrigation system. I don’t have an irrigation system, so here are some automations I have found useful.
Lightning nearby notification - mobile
This automation notifies me when lightning is within 10 miles of my Tempest. North Dakota summers bring quick-developing storms, so it’s helpful to know when to move the kids inside. I used a notification tag so each new alert replaces the previous one, preventing a stack of alerts during a storm.
1
2
3
4
5
6
7
8
9
10
11
12
13
14
15
16
17
18
19
20
21
alias: Tempest - Lightning Nearby Alert
description: Notify when lightning is detected within 10 miles.
triggers:
  - trigger: numeric_state
    entity_id:
      - sensor.[PLACEHOLDER_LIGHTNING_AVG_DISTANCE]
    above: 0
    below: 11
conditions: []
actions:
  - action: notify.[PLACEHOLDER_NOTIFY_SERVICE]
    metadata: {}
    data:
      title: ⚡ Lightning nearby
      message: >-
        Lighting detected ~{{
        states('sensor.[PLACEHOLDER_LIGHTNING_AVG_DISTANCE]') }} miles away.
        Consider moving inside.
      data:
        tag: lightning_nearby
mode: single
Raining now notification
This automation will notify you when your Tempest detects hail, rain, or rain & hail. I set a tag to replace the notification on my phone so I don’t get a stack of notifications during a storm just the latest detection.
1
2
3
4
5
6
7
8
9
10
11
12
13
14
15
16
17
18
19
20
21
22
23
24
25
26
27
28
29
30
31
32
alias: Tempest - Precipitation
description: "Sends a notification for hail, rain, or rain & hail"
triggers:
  - trigger: state
    entity_id:
      - sensor.[PLACEHOLDER_PRECIPITATION_TYPE]
    from: none
conditions:
  - condition: template
    value_template: >-
      {{ trigger.to_state.state not in ['unknown','unavailable','none'] }}
actions:
  - variables:
      precip: "{{ trigger.to_state.state }}"
      message: |-
        {% if precip == 'rain' %}
          Rain just started.
        {% elif precip == 'hail' %}
          Hail detected!
        {% elif precip == 'rain_hail' %}
          Rain and hail are falling.
        {% else %}
          Precipitation detected (type: {{ precip }}).
        {% endif %}
  - action: notify.[PLACEHOLDER_NOTIFY_SERVICE]
    metadata: {}
    data:
      title: 🌧️ Precipitation Detected
      message: "{{ message }}"
      data:
        tag: precipitation_detected
mode: single
You can keep this as your general rain alert. To make it more actionable, add Aqara Door and Window Sensors so Home Assistant notifies you only when rain starts and a window is open.
Daily summary email
I created an automation that emails a daily weather summary to my local TV news station along with a picture of my dogs (to get them on the pet of the day). You could just as easily adapt this to send a personal weather email to yourself or family each morning. A useful utility to keep around for testing email automations is Papercut SMTP which I wrote about in my Mock Your Email Server, Not Your Users: Testing with Papercut SMTP post.
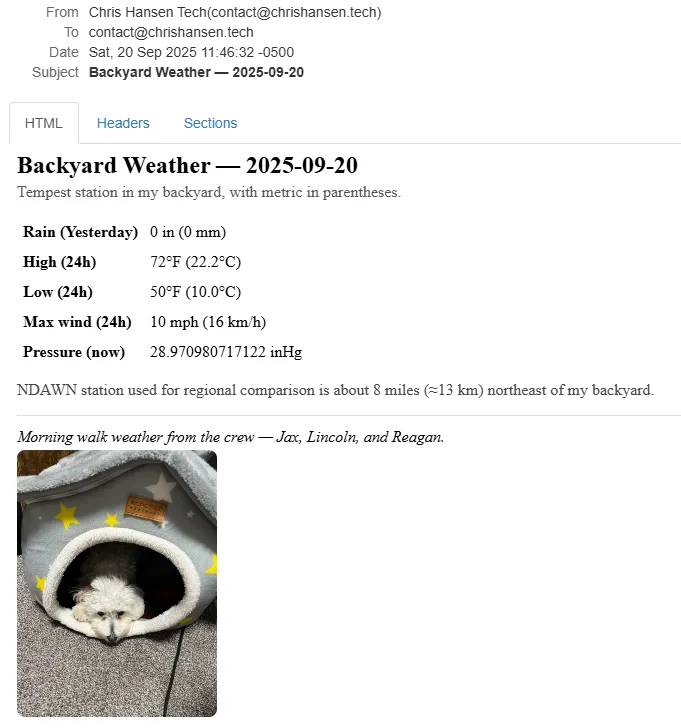 Example Weather Email
You will need an SMTP notification integration setup you can either use the Home Assist base SMTP integration or the HACS Email Notifier integration that basically adds a GUI to the base integration.
Because Tempest sensors provide only live readings, we need to create additional sensors to track rolling values such as total rainfall, min/max temperatures, and min/max wind speeds.
In your configuration.yaml file make sure you have the following includes:
1
2
sensor: !include sensors.yaml
utility_meter: !include utility_meters.yaml
The YAML to add to the sensors.yaml to add sensors to track the values.
1
2
3
4
5
6
7
8
9
10
11
12
13
14
15
16
17
18
19
20
21
22
23
24
25
26
27
28
29
30
31
32
33
34
35
36
37
38
39
40
41
42
43
# 24h max temperature
- platform: statistics
  name: Tempest Temp Max 24h
  entity_id: sensor.[PLACEHOLDER_TEMPERATURE]
  state_characteristic: value_max
  max_age:
    hours: 24
  sampling_size: 5000

# 24h min temperature
- platform: statistics
  name: Tempest Temp Min 24h
  entity_id: sensor.[PLACEHOLDER_TEMPERATURE]
  state_characteristic: value_min
  max_age:
    hours: 24
  sampling_size: 5000

# 24h max sustained wind
- platform: statistics
  name: Tempest Wind Max 24h
  entity_id: sensor.[PLACEHOLDER_WIND_SPEED]
  state_characteristic: value_max
  max_age:
    hours: 24
  sampling_size: 5000

# 24h peak wind gust
- platform: statistics
  name: Tempest Wind Gust Max 24h
  entity_id: sensor.[PLACEHOLDER_WIND_GUST]
  state_characteristic: value_max
  max_age:
    hours: 24
  sampling_size: 5000

# Rain accumulation
- platform: integration
  name: Tempest Rain Accumulated
  source: sensor.[PLACEHOLDER_PRECIPITATION]
  method: left
  unit_time: min
  round: 3
The YAML to add to the utility_meters.yaml for the daily rain total tracking that will reset daily.
1
2
3
tempest_rain_daily:
  source: sensor.tempest_rain_accumulated
  cycle: daily
The YAML for the actual automation to send the email.
1
2
3
4
5
6
7
8
9
10
11
12
13
14
15
16
17
18
19
20
21
22
23
24
25
26
27
28
29
30
31
32
33
34
35
36
37
38
39
40
41
42
43
44
45
46
47
48
49
50
51
52
53
54
55
56
57
58
59
60
61
62
63
64
65
66
67
68
69
70
71
72
73
alias: Weather Email
description: "Email to local TV station each morning"
triggers:
  - at: "04:00:00"
    trigger: time
actions:
  - variables:
      rain_in: >-
        {{ state_attr('sensor.tempest_rain_daily', 'last_period')|float(0) |
        round(2) }}
      rain_mm: "{{ (rain_in * 25.4) | round(0) }}"
      tmax_f: "{{ states('sensor.tempest_temp_max_24h') }}"
      tmin_f: "{{ states('sensor.tempest_temp_min_24h') }}"
      tmax_c: "{{ ((tmax_f - 32) * 5/9) | round(1) }}"
      tmin_c: "{{ ((tmin_f - 32) * 5/9) | round(1) }}"
      wmax_mph: "{{ states('sensor.tempest_wind_max_24h') }}"
      wmax_kmh: "{{ (wmax_mph * 1.609) | round(0) }}"
      wgust_mph: "{{ states('sensor.tempest_wind_gust_max_24h') | float(0) | round(0) }}"
      wgust_kmh: "{{ (wgust_mph * 1.609) | round(0) }}"
      press: "{{ states('sensor.st_00180121_air_pressure') }}"
      press_uom: |-
        {{ state_attr('sensor.st_00180121_air_pressure','unit_of_measurement')
           or 'inHg' }}
      dog_image_path: /config/www/dogs/daily.jpg
      dog_caption: Morning walk weather from the crew — Jax, Lincoln, and Reagan.
      html_body: |-
        <html>
          <body style="font-family: Arial, Helvetica, sans-serif; color:#111;">
            <h2 style="margin-bottom:4px;">
              Backyard Weather — {{ now().strftime('%Y-%m-%d') }}
            </h2>
            <p style="margin-top:0;color:#555;">
              Tempest station in my backyard, with metric in parentheses.
            </p>
            <table cellpadding="6" cellspacing="0" border="0"
                   style="border-collapse:collapse; margin-top:6px;">
              <tr><td><strong>Rain (Yesterday)</strong></td>
                  <td>{{ rain_in }} in ({{ rain_mm }} mm)</td></tr>
              <tr><td><strong>High (24h)</strong></td>
                  <td>{{ tmax_f }}°F ({{ tmax_c }}°C)</td></tr>
              <tr><td><strong>Low (24h)</strong></td>
                  <td>{{ tmin_f }}°F ({{ tmin_c }}°C)</td></tr>
              <tr><td><strong>Max wind (24h)</strong></td>
                  <td>{{ wmax_mph}} mph ( {{ wmax_kmh }} km/h)</td></tr>
              <tr>
                  <td><strong>Max gust (24h)</strong></td>
                  <td>{{ wgust_mph }} mph ({{ wgust_kmh }} km/h)</td></tr
              <tr><td><strong>Pressure (now)</strong></td>
                  <td>{{ press }} {{ press_uom }}</td></tr>
            </table>

            <p style="margin-top:14px; color:#444;">
              NDAWN station used for regional comparison is about 8 miles
              (≈13 km) northeast of my backyard.
            </p>

            <hr style="border:none; border-top:1px solid #ddd; margin:12px 0;" />

            <p style="margin:6px 0 4px 0;"><em>{{ dog_caption }}</em></p>
            <p style="margin:0; color:#777; font-size:12px;">
            <img src="cid:daily.jpg" style="max-width:200px; height:auto; border-radius:8px;" />
            </p>
          </body>
        </html>
  - data:
      title: Backyard Weather — {{ now().strftime('%Y-%m-%d') }}
      message: ""
      data:
        html: "{{ html_body }}"
        images:
          - "{{ dog_image_path }}"
    action: notify.papercut
mode: single
Alexa backyard weather script
I wanted Alexa to tell me the backyard weather conditions I care about—like temperature and UV index—before my girls head outside. Instead of checking my phone or a dashboard, I can just ask Alexa for a quick summary. I created a script that generates a spoken message using my Tempest data.
1
2
3
4
5
6
7
8
9
10
11
12
13
14
15
16
17
18
19
20
21
22
23
24
25
26
27
28
29
30
31
32
33
34
35
36
37
38
39
40
41
42
43
44
45
46
47
48
alias: Alexa Weather
description: "Send a TTS message to an Alexa speaker."
sequence:
  - variables:
      precip_type: "{{ states('sensor.[PLACEHOLDER_PRECIP_TYPE]') }}"
      feels: "{{ states('sensor.[PLACEHOLDER_FEELS_LIKE]') | float(0) | round(1) }}"
      temp_uom: >-
        {{ state_attr('sensor.[PLACEHOLDER_FEELS_LIKE]', 'unit_of_measurement') or '°F' }}
      humidity: "{{ states('sensor.[PLACEHOLDER_HUMIDITY]') | float(0) | round(0) }}"
      uv: "{{ states('sensor.[PLACEHOLDER_UV_INDEX]') | float(0) | round(1) }}"
      wind: "{{ states('sensor.[PLACEHOLDER_WIND_SPEED]') | float(0) | round(0) }}"
      gust: "{{ states('sensor.[PLACEHOLDER_WIND_GUST]') | float(0) | round(0) }}"
      wind_uom: >-
        {{ state_attr('sensor.[PLACEHOLDER_WIND_SPEED]', 'unit_of_measurement') or 'mph' }}
      windy_threshold: 15
      is_raining: "{{ precip_type in ['rain', 'rain_hail'] }}"
      precip_phrase: |-
        {% if is_raining %}
          {% if precip_type == 'rain_hail' %}
            It's raining with hail.
          {% elif precip_type == 'hail' %}
            Hail is falling.
          {% else %}
            It's raining.
          {% endif %}
        {% elif precip_type in ['unknown', 'unavailable'] %}
          Precipitation status is currently unavailable.
        {% else %}
          It is not raining.
        {% endif %}
      wind_phrase: |-
        {% if wind >= windy_threshold %}
          It's windy at {{ wind }} {{ wind_uom }}{% if gust > wind %}, gusting to {{ gust }}{% endif %}.
        {% elif wind > 0 %}
          Wind {{ wind }} {{ wind_uom }}{% if gust > wind %}, gusts to {{ gust }}{% endif %}.
        {% else %}
          Winds are calm.
        {% endif %}
      summary: >-
        {{ precip_phrase }} Feels like {{ feels }} {{ temp_uom }}.
        Humidity {{ humidity }} percent. UV index {{ uv }}.
        {{ wind_phrase }}
  - action: notify.send_message
    metadata: {}
    data:
      message: "{{ summary | replace('\\n',' ') }}"
    target:
      entity_id: notify.[PLACEHOLDER_ALEXA_DEVICE]
Since I use Home Assistant Cloud I expose the script to Amazon Alexa where it will appear as a scene. Then I just needed to create a routine in the Alexa app.
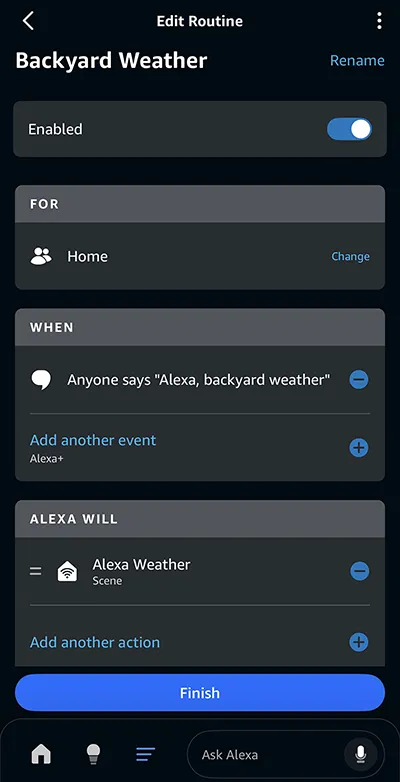 Alexa Routine
Viewing other Tempest stations
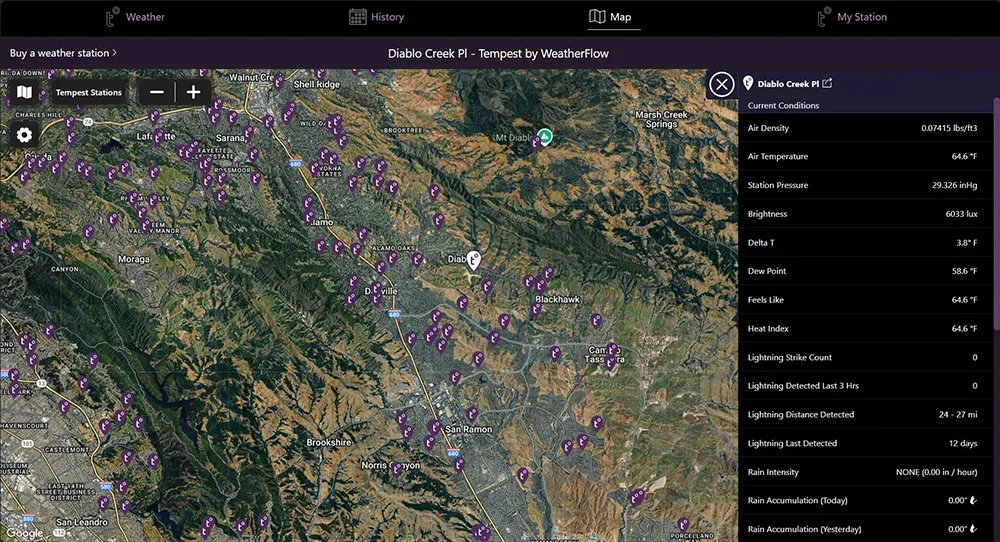 Tempest Online Map
Using the Tempest Online Map you can view other Tempest weather stations in your area and around the world. It’s handy for comparing readings with your neighbors and spotting small differences in local conditions. My station is wide open to the wind, so it often shows higher gusts compared to stations tucked in closer to houses or trees.
The map is also useful when you’re traveling or planning outdoor events. You can check real-time conditions near a park, lake, or even a different city where family lives. Since every station is user-owned, the network becomes a kind of citizen science project—lots of small contributions adding up to better hyperlocal forecasts.
Keep in mind that not every station is perfectly placed. A sensor mounted too close to a house or tree may report skewed rainfall or wind data. Use nearby stations for general comparisons, but rely on your own setup for the most accurate readings at your location.
My experience with accuracy
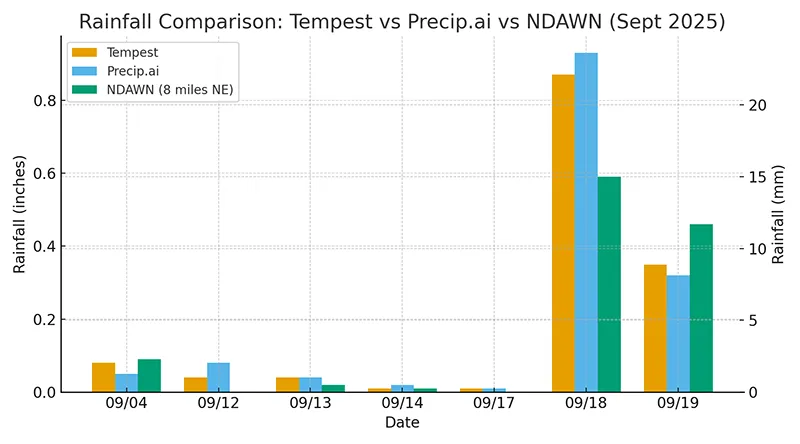 Comparison of daily rainfall totals in September 2025
To see how well the Tempest measures rain in my backyard, I compared it against two other sources: Precip.ai and the NDAWN (North Dakota Agricultural Weather Network) station located about 8 miles (≈13 km) northeast of me. NDAWN is a system of over 160 automated stations run by the North Dakota State Climate Office and North Dakota State University (NDSU), making it a reliable—but not always hyper-local—point of comparison.
| date | Tempest | Precip.ai | NDAWN |
|---|---|---|---|
| 2025/09/04 | 0.08” (2 mm) | 0.05” (1 mm) | 0.09” (2 mm) |
| 2025/09/12 | 0.04” (1 mm) | 0.08” (2 mm) | 0.00” (0 mm) |
| 2025/09/13 | 0.04” (1 mm) | 0.04” (1 mm) | 0.02” (1 mm) |
| 2025/09/14 | 0.01” (0.3 mm) | 0.02” (1 mm) | 0.01” (0.3 mm) |
| 2025/09/17 | 0.01” (0.3 mm) | 0.01” (0.3 mm) | 0.00” (0 mm) |
| 2025/09/18 | 0.87” (22 mm) | 0.93” (24 mm) | 0.59” (15 mm) |
| 2025/09/19 | 0.35” (9 mm) | 0.32” (8 mm) | 0.46” (12 mm) |
The results are encouraging. On light rain days, Tempest and Precip.ai usually match within a few hundredths of an inch (1–2 mm). NDAWN sometimes differs, which makes sense since that station is miles away and local showers don’t always hit both locations equally.
On heavier events, like September 18, the difference is clear. My backyard saw 0.87” (22 mm) on the Tempest, 0.93” (24 mm) from Precip.ai, but only 0.59” (15 mm) at the NDAWN site. That’s the value of having a sensor right in my yard — it caught rainfall that missed the official station northeast of me.
Precip.ai is interesting because it doesn’t use a physical sensor. Instead, it relies on radar and satellite data combined with machine learning to estimate precipitation. This makes it a good regional dataset, but it can’t beat hyper-local sensors like the Tempest when storms are spotty.
If you want a quick way to double-check accuracy at home, a simple manual rain gauge is still hard to beat. Something like this basic rain gauge on Amazon does the job without much fuss.
Final thoughts
Owning the Tempest has been more than just a gadget upgrade—it’s changed how I think about the weather around my home. Instead of relying on regional forecasts, I have real measurements from my own backyard. That makes a difference when deciding whether to send the kids outside, plan yard work, or just know if I should put on the grill cover.
What I like most is how it ties into the rest of my smart home. Notifications about rain or lightning, voice summaries through Alexa, and dashboards that actually show what’s happening outside right now all make the data useful instead of just interesting.
Accuracy will never be perfect—no sensor is—but having hyper-local readings has already proven more reliable than stations miles away. For me, that balance of practicality, integration, and curiosity makes the Tempest one of my favorite additions to the homelab.
Frequently Asked Questions
What sensors does the Tempest weather station measure?
The Tempest measures temperature, humidity, pressure, wind speed, wind gusts, wind direction, UV index, solar radiation, and lightning distance. It also uses a haptic sensor to detect rain and hail.
Does the Tempest weather station require a subscription?
No subscription is required to use the Tempest with the app or Home Assistant. A free Tempest account gives you access to your station’s live data. If you want extended API access, you can generate a personal token at no cost.
How accurate is the Tempest rain sensor?
The haptic rain sensor is quite accurate for most backyard use cases. In my comparisons with NDAWN (a regional weather network) and Precip.ai, the Tempest usually matches closely, especially for light to moderate rain. For extra confidence, you can also use a manual rain gauge as a backup.
Can the Tempest integrate with Home Assistant?
Yes, the Tempest works with Home Assistant both locally and through the WeatherFlow cloud integration. Local integration gives you real-time sensor data, while the cloud option adds forecast data. Both can be used in automations and dashboards.
Can I use the Tempest to control irrigation systems?
Yes. Many people connect the Tempest to smart irrigation controllers like Rachio or RainMachine through Home Assistant. This allows your sprinklers to skip watering when rain is detected or adjust schedules based on local weather conditions.
Want to share your thoughts or ask a question?
This blog runs on coffee, YAML, and the occasional dad joke.
If you’ve found a post helpful, you can
support my work or
☕ buy me a coffee.
Curious about the gear I use? Check out my smart home and homelab setup.