From Hyper-V to Proxmox: Migrating Windows VMs
Back in January 2023, I wrote an Obsidian note documenting how I migrated a Hyper-V VHDX into Proxmox. At the time, I had just spent days piecing together half-answers from forums and scattered docs, and I didn’t want anyone else to struggle like that. I told myself that someday I’d turn these notes into a blog post. It just took me two years—and the launch of this blog—before I finally hit publish.
I’ve worked from home since 2017 and for years I relied on an HP workstation in my office to run all my development VMs in Hyper-V on Windows 10. It did the job, but it couldn’t upgrade to Windows 11 because of the TPM 2 requirement, and the constant fan noise plus spinning disks made it less than ideal to share an office with every day. When we moved into our house, I realized I could finally get the noisy machine out of my office. I reloaded it with Proxmox, converted the Hyper-V VMs over, and moved it into the storage room with the rest of my networking gear. Now I have always-on VMs I can reach from my work laptop over Remote Desktop.
That’s where this guide comes from. The same process I used to migrate those Hyper-V dev VMs also works for a very different scenario: recovering a dead or retired laptop. By pulling the drive, running it through Disk2VHD, and importing into Proxmox, you can boot the old system just long enough to grab your files and settings.
Resources for This Project
ChrisHansenTech is a participant in the Amazon Services LLC Associates Program, an affiliate advertising program designed to provide a means for sites to earn advertising fees by advertising and linking to Amazon.com. As an Amazon Associate I earn from qualifying purchases.
Software
- Proxmox - I am currently using version 8.4.1
- WinSCP - To transfer your VHDX files to Promox through SFTP
Hardware
- GMKtek Mini PC - Great little machine to run Proxmox with a bunch of VMs.
- Intel i7-13620H
- 32GB RAM
- 2TB SD
If you want to see more of the hardware I use in my homelab, check out my Tech I Use page.
Migrating from Hyper-V to Proxmox
Use the following steps to migrate a Windows VHDX (Generation 2) to Proxmox as a QEMU virtual machine.
- Copy the .vhdx file to the Proxmox server or to a network share
that the server can access.
- Tip: Use an SFTP client such as WinSCP.
- Create a new VM.
- On the General tab, set the Name.
- On the OS tab:
- Do not use any installation media.
- For Type, select Microsoft Windows.
- For Version, select the version that matches the VHDX.
- Select Add additional drive for VirtIO Drivers.
- Select the ISO image for your VirtIO drivers.
- On the System tab:
- For Machine, select q35.
- For SCSI Controller, select VirtIO SCSI.
- Select QEMU Agent.
- For BIOS, select OVMF (UEFI).
- Select Add EFI Disk.
- For EFI Storage, select your storage location.
- Note: If you are converting a Windows 11 VM, select Add TPM, set the TPM Storage volume, and for Version, select v2.0.
- On the Disks tab, remove the default disks.
- On the CPU tab, set the number of cores.
- On the Memory tab, set the amount of RAM.
- On the Network tab, for Model, select VirtIO.
- Finish creating the VM.
- Note the VM ID for later use.
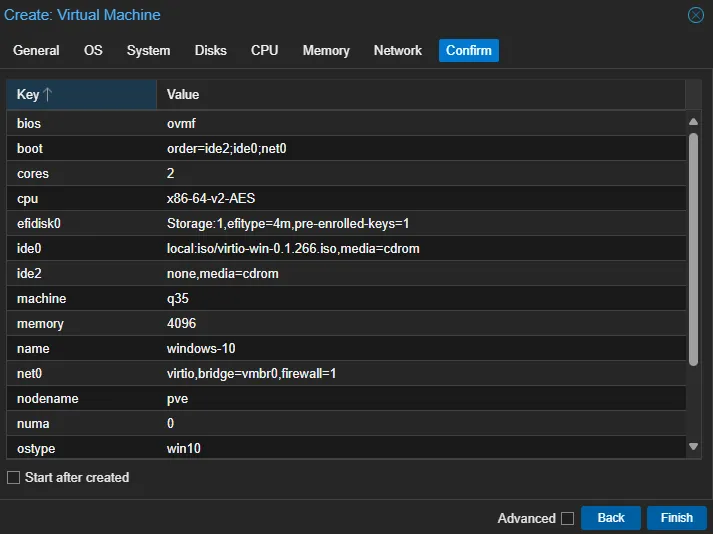 Proxmox New VM Wizard
- Import the disk into the VM.
- Select the Proxmox node.
- Select Shell (or right-click the node and select Shell).
- If you do not remember the storage name, run:
1
pvesm status
- Run the import command:
1
qm importdisk {vm_id} {vhdx_file} {storage}
Example:
1
qm importdisk 103 ./Win10.vhdx Storage
 Proxmox disk image import
- Attach the imported disk.
- Open the VM Hardware tab.
- Attach the imported disk as SATA (usually shown as Unused Disk 0).
- Double-click the disk and set Bus/Device to SATA. Select Add.

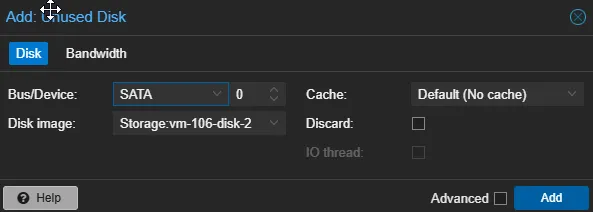 Proxmox Attach Disk
- In the Hardware tab, select Add and create a 1 GB VirtIO Block
disk.
- Note: This small disk is temporary and forces Windows to load VirtIO drivers.
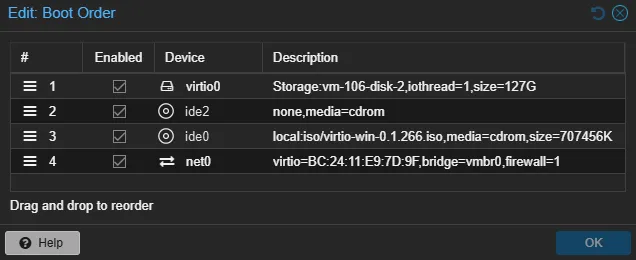
- Open the VM Options tab and select Boot Order.
- Set the SATA disk as the first device and select Enabled.
- Select OK.
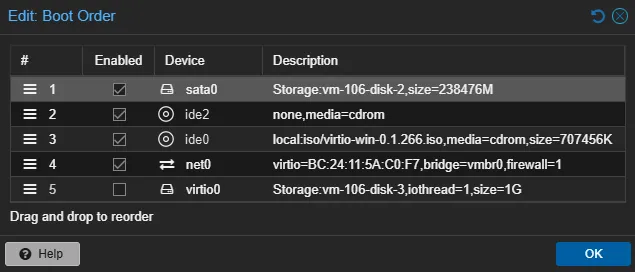 Proxmox Boot Order
- Select Console, then Start Now.
- Install the VirtIO drivers in Windows.
- Inside the VM, install the VirtIO drivers.
- Verify that the VirtIO disk appears in Disk Management.
- Shut down the VM.
 Install VirtIO Drivers
- Switch to VirtIO for the main disk.
- In Proxmox, detach the drives (Detach > Yes).
- Reattach the main disk (Unused Disk 0) as VirtIO Block.
- Remove the 1 GB VirtIO disk (Unused Disk 1).
- Update the Boot Order to use the VirtIO disk.
- Start the VM.
 Proxmox Boot Order Final
At this point, the Windows VM runs natively in Proxmox with better performance than the default SATA configuration.
 Finshed VM Conversion
Tips and Gotchas
- Windows Activation: depending on your license, activation may fail in Proxmox. For recovery use, it usually doesn’t matter.
- Drivers: VirtIO drivers are essential for performance. Without them Windows may crawl.
- Storage: Make sure you have enough space on your Proxmox storage pool for the VHDX conversion.
- Performance: VirtIO vs SATA makes a huge difference. Take the extra step to install drivers.
Using a Microsoft Account for Login
If your Windows VM uses a Microsoft Account for login, make sure the VM has network access after migration. Without a working network driver, Windows cannot authenticate and you will be locked out.
- Install the VirtIO network driver (NetKVM) while the VM is still running in Hyper-V.
- Mount the VirtIO ISO and install the driver before shutting down and migrating.
- Optional: Install the QEMU Guest Agent at the same time.
This ensures the VM can connect immediately on Proxmox, allowing Microsoft Account login to work.
Recovery: Forgot to Install the Network Driver
If you migrated without pre-installing the VirtIO network driver, you can still recover access by using Windows Safe Mode. Safe Mode allows cached login without requiring online authentication.
- In Proxmox, start the VM.
- Try to enter Safe Mode:
- Press F8 repeatedly in the console during boot (works best on older Windows versions) or hold Shift + F8 for newer versions of Windows. These usually don’t work in the Proxmox web console.
- If those fail, power off the VM three times during the spinning dots screen. On the fourth boot, Windows will load Repair mode.
- Navigate to Troubleshoot → Advanced Options → Startup Settings → Restart.
- On restart, press 4 to enable Safe Mode.
- Once in Safe Mode, log in with your Microsoft Account (Windows uses cached credentials offline).
- Mount the VirtIO ISO in Proxmox and install the NetKVM driver.
- Reboot the VM normally. Network connectivity will now work.
The Safe Mode path is a recovery option. Installing VirtIO drivers in Hyper-V before migration is always the safer approach.
Closing Thoughts
This whole conversion process is what planted the seed for this blog. I wrote the steps down in Obsidian in January 2023, two years before I launched the site. It feels good to finally publish them here, so the next person doesn’t have to burn days searching the way I did. Whether you’re a homelabber moving off Hyper-V or just trying to grab files off a failed machine, this process to convert a Hyper-V VHDX to Proxmox makes it possible.
Frequently Asked Questions
Can I convert a Hyper-V VHDX to Proxmox without reinstalling Windows?
Yes. You can import the VHDX directly into Proxmox as a QEMU virtual machine. As long as you install the VirtIO drivers, Windows will boot and run normally.
Do I need to use Disk2VHD for migration?
No. Disk2VHD is only needed if you are imaging a physical machine, such as an old laptop or desktop. If you already have a VHDX from Hyper-V, you can import it directly into Proxmox.
Why won’t Windows let me log in after migrating?
If your VM uses a Microsoft Account for login, Windows needs a working network driver to authenticate. Install the VirtIO network driver before migration to avoid being locked out.
How much space do I need in Proxmox for the VHDX?
Make sure your storage pool has at least as much free space as the maximum size of the VHDX. You can shrink and compact the VHDX in Hyper-V before migrating to reduce space usage.
Will Windows activation still work after migration?
It depends on your license. OEM and hardware-tied licenses may not reactivate in Proxmox. For recovery use, this usually doesn’t matter.
Want to share your thoughts or ask a question?
This blog runs on coffee, YAML, and the occasional dad joke.
If you’ve found a post helpful, you can
support my work or
☕ buy me a coffee.
Curious about the gear I use? Check out my smart home and homelab setup.