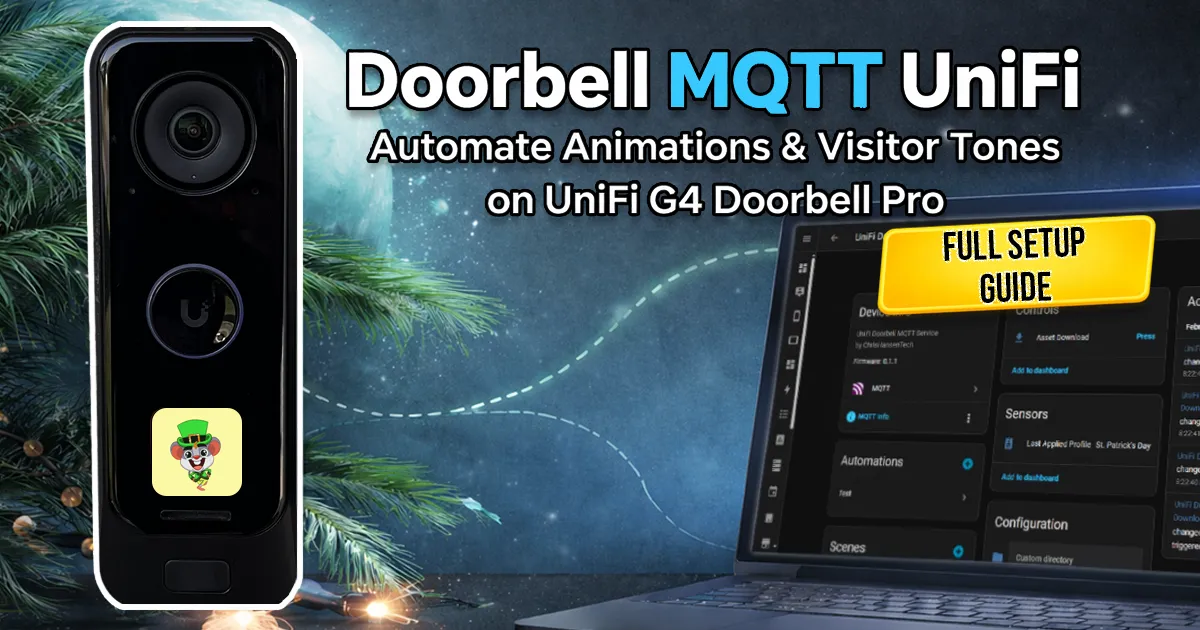
Doorbell MQTT UniFi: UniFi G4 Doorbell Pro + Home Assistant Setup (v0.2.0)
Learn how to integrate the UniFi G4 Doorbell Pro with Home Assistant using Doorbell MQTT UniFi. Automate animations, sounds, and profiles with MQTT and Docker.
When I bought the UniFi G4 Doorbell Pro, one of the features I liked most was the ability to customize the animation and sound on the display.
Around the holidays I usually change it to match the season. Santa at Christmas. Shamrocks in March. Birthday animations when one of my daughters has a party.
The problem is that UniFi Protect does not really make this automatable. Animations and sounds can be uploaded through the Protect interface, but there is no simple way to manage them programmatically or trigger changes from Home Assistant.
That is the gap this project fills.
Doorbell MQTT UniFi is a small service written in C that connects the UniFi G4 Doorbell Pro to MQTT and Home Assistant. The container uploads animations and sounds, applies configuration changes, and exposes controls through MQTT discovery.
Everything runs locally. No cloud services. No API polling loops. Just a container that runs when you need it.
This guide walks through installing the container, configuring it, and integrating it with Home Assistant.
How the Service Works
The container acts as a bridge between three systems:
- UniFi Protect doorbell
- MQTT broker
- Home Assistant
The container connects to the doorbell over SSH, performs the requested action, and publishes status updates through MQTT.
Home Assistant automatically discovers the entities and creates a device for controlling the doorbell.
Because everything runs locally, there are no cloud round trips and no persistent SSH connections.
The container only connects to the doorbell when it needs to apply a change.
IPC vs Legacy Apply Methods
Version 0.2.0 introduced a faster configuration method called IPC (inter-process communication).
Older versions modified the doorbell configuration files and restarted services. That approach works but typically takes around thirty seconds before the change becomes visible.
The IPC method instead sends configuration messages directly to the doorbell’s running processes. The animation and sound configuration is updated in memory without restarting the device.
Typical update times:
- IPC: less than two seconds
- Legacy: roughly thirty seconds
New installations default to IPC.
Enabling IPC When Upgrading from v0.1.1
If you are upgrading from v0.1.1, the service will continue using the legacy method unless you explicitly enable IPC.
You can enable it in one of two ways.
Option 1: Environment variable
1
UNIFI_APPLY_METHOD=ipc
Option 2: config.json
Add the following section to your /config/config.json file.
1
2
3
4
5
{
  "unifi": {
    "apply_method": "ipc"
  }
}
After updating the configuration, restart the container.
1
docker restart doorbell-mqtt-unifi
Once enabled, profile changes should apply in under two seconds instead of the longer restart cycle used by the legacy method.
Legacy mode is still available if you prefer the original behavior.
Requirements
ChrisHansenTech is a participant in the Amazon Services LLC Associates Program, an affiliate advertising program designed to provide a means for sites to earn advertising fees by advertising and linking to Amazon.com. As an Amazon Associate I earn from qualifying purchases.
Before installing the container, make sure you have the following:
- UniFi G4 Doorbell Pro PoE Kit
- Home Assistant with MQTT enabled
- An MQTT broker such as Mosquitto
- SSH access to the doorbell
The container connects to the doorbell using the UniFi Protect recovery code as the SSH password.
Enabling SSH on the UniFi G4 Doorbell Pro
You can enable SSH on the doorbell using the Home Assistant UniFi Protect integration. By default, the Enable SSH entity in the Configuration section is disabled.
Once the entity is enabled, you can toggle SSH on and off from Home Assistant.
 SSH Enabled Entity
Installing the Container
The easiest way to run the service is with Docker.
1
2
3
4
5
6
7
8
docker run -d \
    --name doorbell-mqtt-unifi \
    --restart unless-stopped \
    -e UNIFI_PROTECT_RECOVERY_CODE=your_recovery_code \
    -v /opt/doorbell-mqtt-unifi/config:/config \
    -v /opt/doorbell-mqtt-unifi/profiles:/profiles \
    -v /opt/doorbell-mqtt-unifi/sounds:/sounds \
    ghcr.io/chrishansentech/doorbell-mqtt-unifi:latest
On the first startup the container generates a default configuration file inside the config directory.
The main configuration file is: /config/config.json
Profiles and animation assets live under: /profiles/
Ad hoc sound effects live under: /sounds/
The container image is built as a multi-architecture image and supports both amd64 and ARM64 systems.
I validated it on my main amd64 (x86-64) Docker environment as well as a Raspberry Pi 4 running Raspberry Pi OS 64-bit, where both the container and native build worked without modification.
Directory Layout
This is what the directory structure usually looks like on the host.
1
2
3
4
5
6
7
8
9
10
11
/opt/doorbell-mqtt-unifi
 ├─ config/
 │   └─ config.json
 ├─ profiles/
 │   ├─ christmas/
 │   ├─ st_patricks/
 │   └─ birthday/
 └─ sounds/
     ├─ hello.ogg
     ├─ spooky.ogg
     └─ chime.wav
Profiles contain the animation and ring sound assets used by the doorbell. The sounds directory is used for ad hoc sound effects triggered from Home Assistant.
Configuring MQTT and the Doorbell
Open the generated configuration file and update the MQTT and SSH settings.
Example:
1
2
3
4
5
6
7
8
9
10
{
  "mqtt": {
    "host": "192.168.1.10",
    "username": "mqtt",
    "password": "mqtt_password"
  },
  "ssh": {
    "host": "192.168.1.50"
  }
}
After editing the file restart the container.
1
docker restart doorbell-mqtt-unifi
Once the container reconnects to MQTT the device should automatically appear in Home Assistant.
Home Assistant Integration
When the service connects to MQTT, Home Assistant automatically creates a device named “UniFi Doorbell MQTT Service”
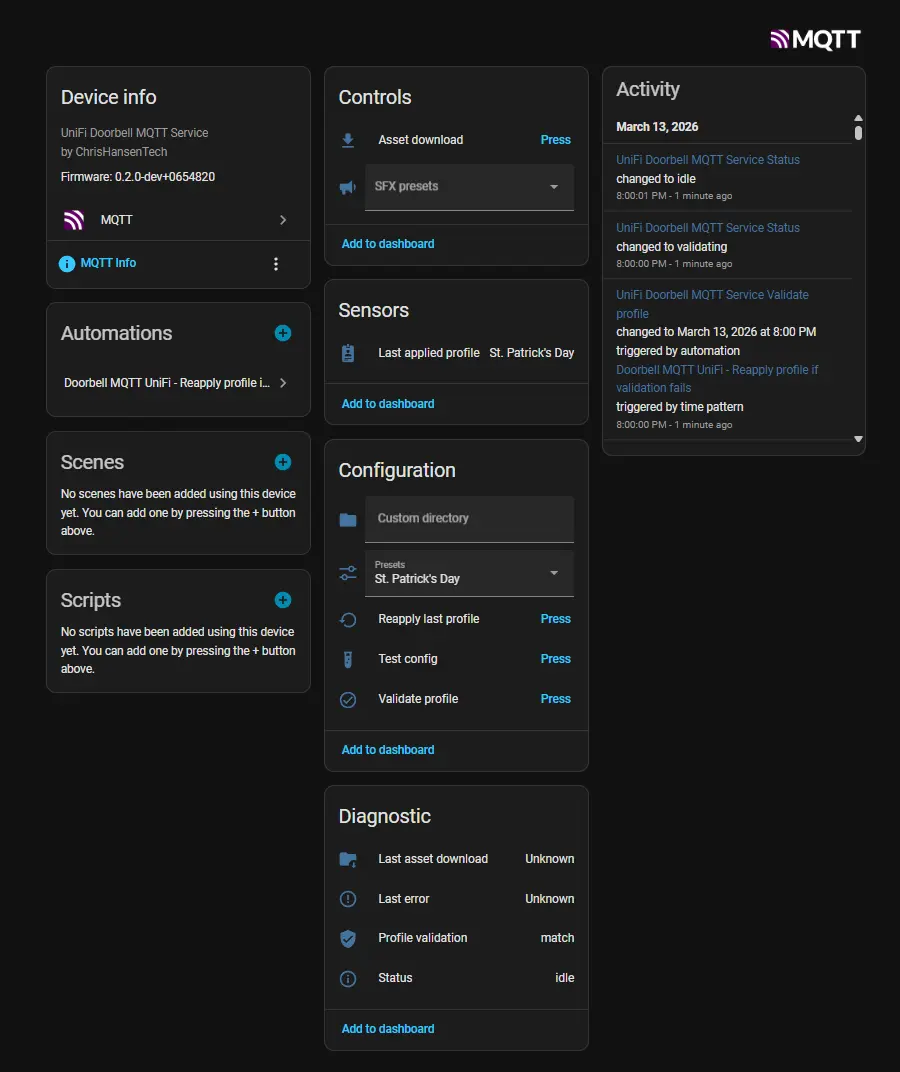 Home Assistant Device
All controls and sensors appear under this device.
Important entities include:
- Presets selector for choosing doorbell profiles
- Custom directory field for testing new profiles
- Asset download button
- SFX presets selector for choosing sound effects
- Profile validation button
- Status and diagnostic sensors
Most users interact with the doorbell through the preset selector.
Selecting a preset uploads the animation and sound files and applies them to the doorbell.
Creating Profiles
Profiles define the custom animation and sound used by the UniFi G4
Doorbell Pro display and speaker.
Instead of manually uploading animations through the UniFi Protect
interface each time you want to change them, profiles allow you to store
the animation, sound, and configuration together in a reusable
directory.
This makes it easy to automate UniFi G4 Doorbell animations from Home
Assistant, schedule seasonal themes, or switch sounds using automations.
Each profile lives inside its own directory under /profiles.
Example:
1
2
3
/profiles/christmas
/profiles/st_patricks
/profiles/birthday
Each profile directory must contain:
profile.json- animation PNG
- sound file (
.oggor.wav)
Example profile.json:
1
2
3
4
5
6
7
8
9
10
11
12
13
14
15
16
17
18
{
    "schemaVersion": 1,
    "welcome": {
        "enabled": true,
        "file": "christmas.png",
        "count": 57,
        "durationMs": 3240,
        "loop": true,
        "guiId": "WELCOME"
    },
    "ringButton": {
        "enabled": true,
        "file": "christmas.ogg",
        "repeatTimes": 1,
        "volume": 100,
        "soundStateName": "RING_BUTTON_PRESSED"
    }
}
The animation must be a 240×240 sprite sheet, and the frame count must match the number of frames encoded in the image.
If the frame count does not match, the animation may play incorrectly or
fail to load.
The sound file is used when the doorbell button is pressed.
Supported formats:
.ogg(recommended).wav
Asset File Size Limits
The doorbell has limited persistent storage for animation and sound assets. On the G4 Doorbell Pro the persistent configuration volume is only about 7–8 MB, so assets must remain small.
Each asset file must be smaller than 1 MB (1024 KB).
This limit is enforced by the doorbell’s internal whitelist.cfg
configuration, which restricts the size of animation and sound assets.
The container validates this limit before attempting an upload.
This limit applies to:
- animation sprite sheets (
.png) - profile ring sounds (
.oggor.wav) - ad hoc sound effects in
/sounds
If a file exceeds the limit, the container rejects it before upload.
The service uploads candidate files to the doorbell’s temporary in-memory filesystem first (which has significantly more space), then calculates whether the full asset set will fit in persistent storage after replacing the existing files.
If the projected remaining persistent storage would fall below 1024 KB, the update is aborted and the temporary files are cleaned up.
Registering Profiles in config.json
Creating the profile directory alone is not enough. Profiles must also
be registered in the container configuration so Home Assistant can
expose them in the Presets selector.
Profiles are defined in the presets section of config.json.
Example:
1
2
3
4
5
6
7
{
  "presets": [
    { "name": "Christmas", "directory": "christmas" },
    { "name": "St. Patrick's Day", "directory": "st_patricks" },
    { "name": "Birthday Party", "directory": "birthday" }
  ]
}
Each preset contains two fields.
-
name
The friendly name displayed in Home Assistant. -
directory
The directory under/profilesthat contains the profile assets.
For example, this configuration:
1
{ "name": "Christmas", "directory": "christmas" }
maps to: /profiles/christmas/
Once the preset is added, restart the container so the new profiles are
loaded.
1
docker restart doorbell-mqtt-unifi
After the restart, the preset will appear in the Presets dropdown in
Home Assistant.
Selecting the preset uploads the animation and sound files and applies
the configuration to the doorbell.
Tips for Organizing Profiles
A few practices that make managing profiles easier:
- Use lowercase directory names with underscores
- Keep directory names short and filesystem friendly
- Use descriptive preset names for Home Assistant
Example layout:
1
2
3
4
5
/profiles
 ├─ christmas
 ├─ st_patricks
 ├─ birthday
 └─ halloween
Because profiles are self‑contained directories, they can easily be
copied between systems or shared with other users.
This also makes it easy to maintain a library of seasonal animations and
custom sounds for the UniFi G4 Doorbell Pro without modifying the main
container configuration.
Downloading Assets From the Doorbell
Not everyone wants to create PNG sprite sheets and OGG sound files manually.
One of the features of the UniFi Protect app is that it allows users to upload GIF, JPEG, or PNG images for the welcome animation and MP3 files for the doorbell sound. In the mobile app you can also record a custom sound directly from your phone.
UniFi Protect automatically converts these uploads into the PNG sprite sheet and OGG audio files used internally by the doorbell.
The service takes advantage of this behavior by allowing you to download the currently active animation and sound directly from the doorbell.
Press the Asset Download button in Home Assistant.
The container retrieves the converted animation and sound files from the
doorbell and saves them into a timestamped directory inside
/profiles/downloads.
In addition to the animation and sound files, the service also generates
a profile.json file based on the doorbell’s current configuration so
the downloaded assets can immediately be used as a profile.
For reference, the doorbell’s original configuration files
(ubnt_lcm_gui.conf and ubnt_leds_sounds.conf) are also saved in the
directory. These are useful for inspection or troubleshooting but are
not required for the profile itself.
Profile Validation
Version 0.2.0 also introduces profile validation.
When a profile is applied the container calculates a SHA256 hash of the configuration and saves it locally.
When the validate profile button is pressed the container retrieves the current doorbell configuration and compares it to the stored hash.
Possible results include:
| Result | Meaning |
|---|---|
| match | Doorbell configuration matches the expected profile |
| mismatch | Doorbell configuration differs from the expected profile |
| unknown | No previous state hash exists or validation cannot be performed |
| unsupported | Apply method is configured as legacy, the feature only works with IPC |
This helps detect situations where the doorbell configuration was changed outside the service.
Ad Hoc Sound Effects
The container can also trigger sounds on the doorbell speaker without
changing the configured ring sound.
Sound presets are defined in the sfx section of config.json and
reference audio files stored in the /sounds directory mounted into the
container.
Example configuration:
1
2
3
4
5
6
7
8
9
10
11
12
13
14
"sfx": {
    "presets": [
        {
            "name": "Keep the change",
            "file": "keep_the_change.ogg",
            "volume": 100
        },
        {
            "name": "No solicitors",
            "file": "no_solicitors.ogg"
        }
    ],
    "defaultVolume": 75
}
Each preset defines a sound that can be triggered from Home Assistant.
name
Friendly name displayed in Home Assistant.file
Audio file located in the/soundsdirectory.volume(optional)
Overrides the global default volume for this preset.
If a preset does not define a volume, the defaultVolume value will be
used instead.
Supported formats:
.ogg(recommended).wav
Unlike profile assets, ad hoc sound effects are not stored in the doorbell’s persistent storage. The container uploads the sound file to the doorbell’s temporary in-memory filesystem, plays it once using the doorbell’s playback script, and then removes it.
How Playback Works
When a preset is selected in Home Assistant:
- The audio file is uploaded to a temporary directory on the doorbell
- The doorbell’s
playSound.shscript is executed - The file is removed after playback
Playback typically begins in under one second.
Because this uses the doorbell’s built-in playback script, the sound can
be triggered independently of the normal doorbell ring behavior.
This makes it easy to create automations such as:
- playing a sound when a person is detected
- triggering seasonal sounds for holidays
- announcing events
Example Automations
Example: switch doorbell animation during December.
1
2
3
4
5
6
7
8
9
10
11
12
13
alias: Christmas Doorbell Theme
trigger:
  - platform: time
    at: "00:00:00"
condition:
  - condition: template
    value_template: "{{ now().month == 12 }}"
action:
  - service: select.select_option
    target:
      entity_id: select.doorbell_mqtt_unifi_preset
    data:
      option: Christmas
Example: play a sound when a package is detected.
1
2
3
4
5
6
7
8
9
10
11
alias: Package Delivery Sound
trigger:
  - platform: state
    entity_id: binary_sensor.front_door_package
    to: "on"
action:
  - service: select.select_option
    target:
      entity_id: doorbell_mqtt_unifi_sfxpreset
    data:
      option: Thank driver
Example: validate active profile and reapply on mismatch
1
2
3
4
5
6
7
8
9
10
11
12
13
14
15
16
17
18
19
20
alias: Doorbell MQTT UniFi - Reapply profile if validation fails
description: >-
  Validate the active doorbell profile and reapply it if the applied state does
  not match.
triggers:
  - minutes: /30
    trigger: time_pattern
actions:
  - target:
      entity_id: button.doorbell_mqtt_unifi_profile_validate
    action: button.press
  - delay:
      seconds: 3
  - condition: state
    entity_id: sensor.doorbell_mqtt_unifi_profile_validation
    state: mismatch
  - target:
      entity_id: button.doorbell_mqtt_unifi_reapply_last_profile
    action: button.press
mode: single
Final Thoughts
Once the doorbell is connected to Home Assistant it becomes more than just a doorbell.
The display and speaker can be used as part of your automations. Seasonal themes, custom sounds, and fun interactions for kids are all possible.
And because the entire system runs locally, it stays fast and reliable.
If you want to explore the project or contribute, the source code is available on GitHub.
https://github.com/ChrisHansenTech/doorbell-mqtt-unifi
Related UniFi G4 Doorbell Posts
If you want to go deeper into how the animation system works under the hood, or see the broader UniFi G4 Doorbell Pro series, start here:
Want to share your thoughts or ask a question?
This blog runs on coffee, YAML, and the occasional dad joke.
If you’ve found a post helpful, you can
support my work or
☕ buy me a coffee.
Curious about the gear I use? Check out my smart home and homelab setup.