Automating UniFi Protect Alarms and Webhooks with Home Assistant
Automate UniFi Protect alarms with Home Assistant using webhooks for doorbell, motion, and line-crossing events. Learn how to trigger notifications, actions, and even send commands back to Protect.
Introduction
This post continues my UniFi G4 Doorbell Pro and Home Assistant series.
In Part 2, we’ll dive into UniFi Protect alarms and how to use webhooks to trigger automations in Home Assistant.
In Part 1, I shared my experience living with the G4 Doorbell Pro after 18 months of use and how it integrates with Home Assistant for basic monitoring and LCD message control.
This follow-up covers the UniFi Protect alarms and how to use webhooks to connect real-time events like doorbell rings, motion detection, and package deliveries to your Home Assistant setup.
One area where UniFi Protect Alarm webhooks can be very handy is with Line Crossing events. The line crossing event isn’t exposed in the Home Assistant UniFi Protect integration, but I ran into a problem with my LLM Vision setup. Sometimes the UniFi Protect person-detected sensor would trigger the automation too early, capturing an image of a person still far from the doorbell. With the line crossing event, I can draw a line on the camera view and send a webhook to Home Assistant when that line is crossed.
Resources in This Post
ChrisHansenTech is a participant in the Amazon Services LLC Associates Program, an affiliate advertising program designed to provide a means for sites to earn advertising fees by advertising and linking to Amazon.com. As an Amazon Associate I earn from qualifying purchases.
Hardware
Software and Services
- Webhook.site - Service to send webhooks to for testing and to see the payload.
Understanding UniFi Protect Alarms
UniFi Protect includes an Alarm Manager that can generate events for motion, doorbell presses, and system alerts. You can configure these alarms to send HTTP webhooks to any endpoint—making them ideal for triggering Home Assistant automations.
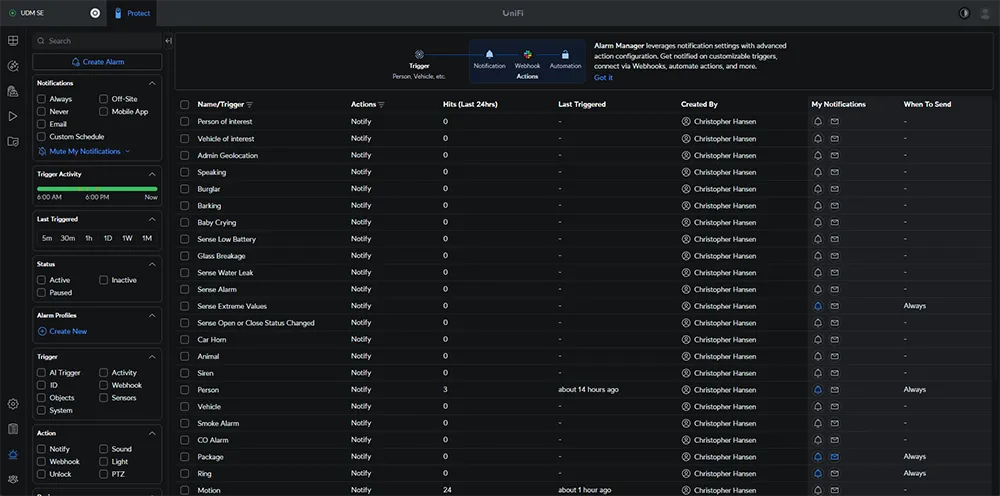 UniFi Protect Alarm Manager screen
These examples are based on UniFi Protect 6.1.78 and UniFi OS 4.3.6 running on a UniFi Dream Machine SE. Your interface may look slightly different depending on firmware version.
Creating a webhook automation in Home Assistant
- Open Home Assistant, and go to Settings → Automations & scenes.
- Select Create automation → Create new automation.
- Click Add trigger.
- Search for Webhook and select Webhook trigger.
- Home Assistant will automatically generate a Webhook ID.
- Click the gear icon and make sure POST and Only accessible from the local network are selected.
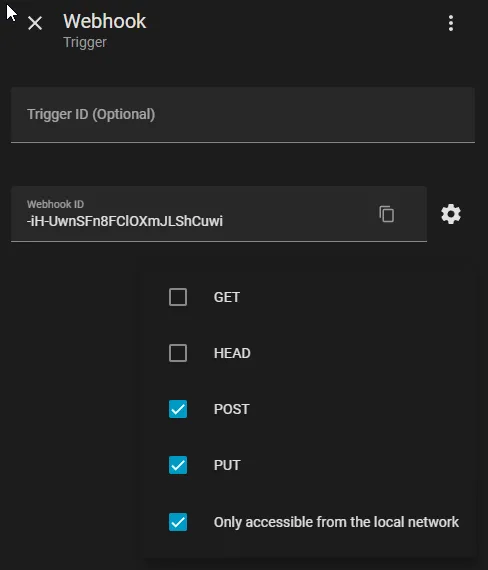 Home Assistant Webhook
For now, complete the automation by sending a simple mobile notification:
- Click Add action.
- Search for your mobile app notification service.
- In Message, enter Someone is at the door.
- In Title, enter Doorbell.
- Click Save.
- Name your automation and click Save again.
Here’s the YAML for the automation you just created:
1
2
3
4
5
6
7
8
9
10
11
12
13
14
15
16
17
alias: Doorbell Webhook
description: "Doorbell event triggered from a webhook"
triggers:
  - trigger: webhook
    allowed_methods:
      - POST
      - PUT
    local_only: true
    webhook_id: "-iH-UwnSFn8FClOXmJLShCuwi"
conditions: []
actions:
  - action: notify.mobile_app_[YOUR_PHONE]
    metadata: {}
    data:
      message: Someone is at the door
      title: Doorbell
mode: single
Creating a UniFi Protect Alarm to send a webhook
With the webhook automation ready in Home Assistant, we can now create an alarm in UniFi Protect to send that webhook.
- Open UniFi Protect.
- Click Alarm Manager → Create Alarm.
- Type Home Assistant Doorbell Press for the alarm name.
- Click Activity.
- Check Ring.
- In Scope, select your doorbell device.
- In Action, click Webhook.
- Change the default Slack Post to Custom Webhook.
- In Delivery URL, enter your Home Assistant webhook address:
http://[your_home_assistant]:8123/api/webhook/[your_hook_id]
- Under Advanced Settings, select POST.
- Click Test Alarm → Test Alarm, then confirm you receive the notification.
- Click Create to save the new alarm.
 Home Assistant Companion App Notification
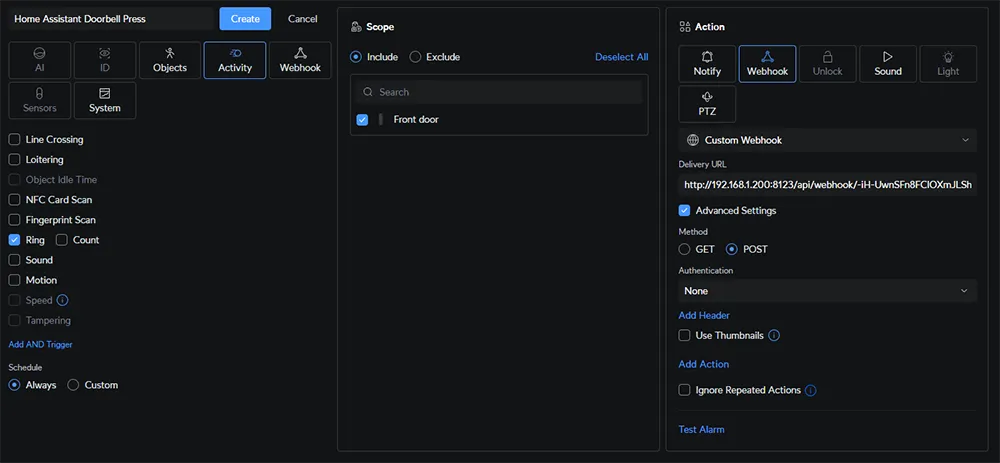 UniFi Protect Create Alarm
The Use Thumbnails option sends the image as a Base64-encoded string. There isn’t an easy way to use that data in Home Assistant.
Using the webhook payload
In our basic automation example, we only used the receipt of an HTTP POST request as the trigger. This means that anything with the webhook URL could send a POST request and trigger the automation. We also didn’t make use of any data contained in the webhook payload.
There aren’t many good resources showing what data UniFi Protect includes in its webhook payload. This is where a service like Webhook.site comes in handy. You can point your webhook URL to the address generated by Webhook.site and view the full JSON payload that UniFi Protect sends.
Here is the JSON for our doorbell alarm, I have put placeholders in parts of the data, with placeholders to show what each value represents.
1
2
3
4
5
6
7
8
9
10
11
12
13
14
15
16
17
18
19
20
21
22
23
24
25
26
27
28
29
30
{
    "alarm": {
        "name": "Home Assistant Doorbell Press",
        "sources": [
            {
                "device": "[DEVICE_MAC_ADDRESS]",
                "type": "include"
            }
        ],
        "conditions": [
            {
                "condition": {
                    "type": "is",
                    "source": "ring"
                }
            }
        ],
        "triggers": [
            {
                "key": "ring",
                "device": "[DEVICE_MAC_ADDRESS]",
                "eventId": "[EVENT_ID]",
                "timestamp": 1760282368873
            }
        ],
        "eventPath": "/protect/events/event/[EVENT_ID]",
        "eventLocalLink": "https://192.168.1.X/protect/events/event/[EVENT_ID]"
    },
    "timestamp": 1760282369282
}
With the JSON payload in hand, we can make our automation more specific so it only triggers when the doorbell event occurs. We’ll update our notification automation so it only fires when it’s the doorbell event—and even include the eventLocalLink as part of an actionable notification.
- Edit the Doorbell Webhook automation.
- Click Add condition
- Search for template and click Template.
- Type in
{{ trigger.json.alarm.sources[0].device == "[DEVICE_MAC_ADDRESS]" }} - Click the notification in the Then do section.
- Add the follwing YAML to the data property
1
2
3
4
  actions:
    - action: URI
      title: Open event
      uri: "{{ trigger.json.alarm.eventLocalLink }}"
The full YAML for our notification is now.
1
2
3
4
5
6
7
8
9
10
11
12
13
14
15
16
17
18
19
20
21
22
23
24
alias: Doorbell Webhook
description: ""
triggers:
  - trigger: webhook
    allowed_methods:
      - POST
      - PUT
    local_only: true
    webhook_id: "-iH-UwnSFn8FClOXmJLShCuwi"
conditions:
  - condition: template
    value_template: "{{ trigger.json.alarm.sources[0].device == \"[DEVICE_MAC_ADDRESS]\" }}"
actions:
  - action: notify.mobile_app_[YOUR_PHONE]
    metadata: {}
    data:
      message: Someone is at the door
      title: Doorbell
      data:
        actions:
          - action: URI
            title: Open event
            uri: "{{ trigger.json.alarm.eventLocalLink }}"
mode: single
Now if we trigger the Home Assistant webhook from another device in UniFi Protect
or from a CURL command such as curl -X POST -H "Content-type: application/json" -d '{ "test": "testing" }' http://192.168.1.x:8123/api/webhook/-iH-UwnSFn8FClOXmJLShCuwi the automation will not fire because the condition is
not true.
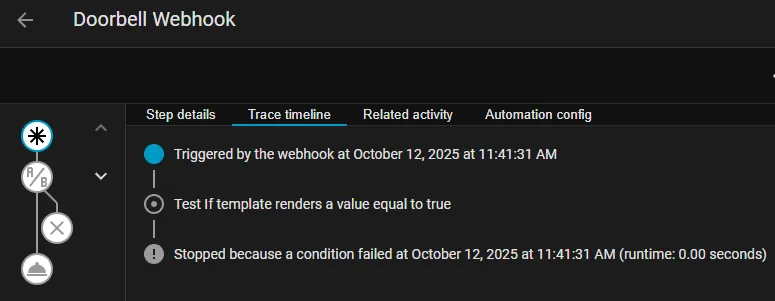 Home Assistant Automation Traces
Additionally, when the automation does fire we can open the UniFi Protect link in a web browser on our phone with the actionable notification.
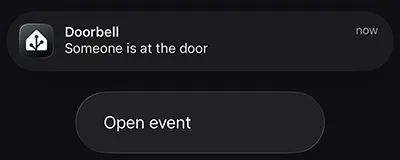 iPhone Actionable Notification
Testing and debugging
If a webhook is not firing:
- Double-check that your Home Assistant URL is externally reachable if Protect is on a separate VLAN.
- Use the History in Alarm Manager to confirm events are firing.
- Watch the Home Assistant logs (
home-assistant.log) for incoming webhook requests.
Once you confirm it’s working, you can start chaining automations, such as:
- Flashing porch lights when the doorbell rings.
- Showing a “Someone’s Here” message on an indoor display.
- Sending a snapshot from the doorbell camera to your phone.
Sending a webhook from Home Assistant to UniFi Protect
You can also send a webhook from Home Assistant to UniFi Protect to trigger an action inside Protect. This lets you use Home Assistant automations to control features like triggering the chime to play a sound and other actions.
For example, you might trigger the doorbell chime when a motion sensor detects someone approaching at night.
We can do this using a rest_command in Home Assistant. First, create an alarm in UniFi Protect.
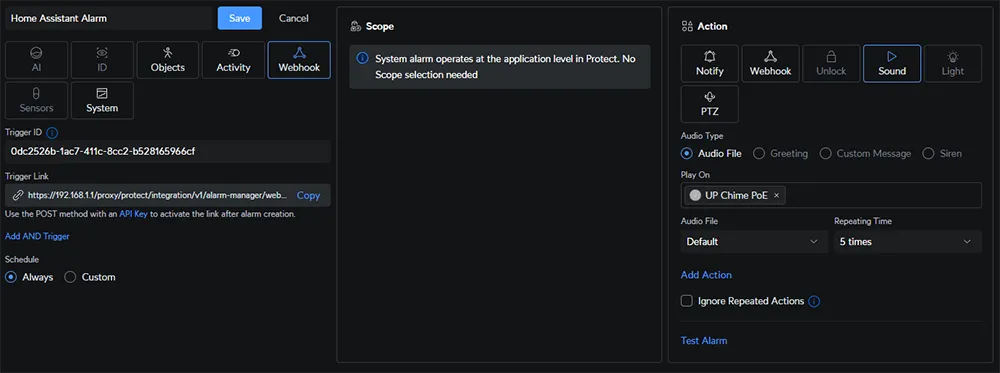 UniFi Protect Webhook Alarm Trigger
Add the following rest_command to your configuration.yaml file in Home Assistant.
1
2
3
4
5
6
7
rest_command:
  unifi_protect_trigger:
    url: "https://[UNIFI_IP]/proxy/protect/integration/v1/alarm-manager/webhook/[PROTECT_WEBHOOK_ID]"
    method: post
    headers:
      X-API-KEY: [UNIFI_API_KEY]
    verify_ssl: false
You can then call the command in an automation like this:
1
2
3
4
5
6
7
8
alias: Trigger UniFi Protect Chime
triggers:
  - trigger: state
    entity_id:
      - binary_sensor.front_door_motion
    to: "on"
actions:
  - action: rest_command.unifi_protect_trigger
This step closes the loop, letting UniFi Protect and Home Assistant talk to each other in both directions.
Wrapping up
Webhooks and alarms open up a new level of control between UniFi Protect and Home Assistant.
In the next part, I’ll cover how to use NFC and fingerprint access with the UniFi G4 Doorbell Pro for secure and personalized smart home entry.
Related posts in this series
- Part 1: Living with the UniFi G4 Doorbell Pro
- Part 2: Automating UniFi Protect Alarms and Webhooks (you’re here)
- Part 3: NFC and Fingerprint Access with Home Assistant
- Part 4: Custom Animations and Sounds with Home Assistant
- Part 5: Doorbell MQTT UniFi
Want to share your thoughts or ask a question?
This blog runs on coffee, YAML, and the occasional dad joke.
If you’ve found a post helpful, you can
support my work or
☕ buy me a coffee.
Curious about the gear I use? Check out my smart home and homelab setup.