Automating My Gas Fireplace with Home Assistant and Shelly
How I integrated my gas fireplace with Home Assistant using a Shelly 1 Gen 4 relay, a Shelly PM Gen 3 for power monitoring, dual thermostats, and safety automations to keep the basement warm during North Dakota winters.
North Dakota winters have a way of reminding you that “basement office” really means “one bad insulation layer away from a meat locker.” Most days the normal heat keeps up, but every once in a while I need a little extra warmth. I used to run a small electric space heater by my desk. After doing the math, it turned out the gas fireplace is actually a bit cheaper for quick bursts of heat. That was enough motivation to integrate the fireplace with Home Assistant.
This post walks through how I wired a Shelly 1 Gen 4 relay into my gas fireplace, why I kept the existing Skytech remote in place, how I added a Shelly PM Gen 3 for power monitoring, and how I use a pair of thermostats in Home Assistant to keep the basement comfortable without babysitting anything.
Before I get into the wiring, a quick note about the setup and a few safety considerations.
My fireplace is a direct-vent unit with a sealed firebox, so all combustion air and exhaust stay outside the house. The main burner is controlled by a low-voltage dry-contact millivolt circuit — the same type used by standard remotes and wall switches — which makes it possible to integrate a smart relay without modifying any internal components or touching the gas system.If you decide to do something similar, make sure you first confirm how your own fireplace is wired and controlled, since not all models use the same system. And as with any project involving electrical work or heat-producing appliances, follow local codes, turn off power before opening junction boxes, and consult a licensed professional if you’re unsure about anything.
This post is simply a walk-through of what I did in my home, not manufacturer guidance or a one-size-fits-all recommendation.
Resources for This Project
ChrisHansenTech is a participant in the Amazon Services LLC Associates Program, an affiliate advertising program designed to provide a means for sites to earn advertising fees by advertising and linking to Amazon.com. As an Amazon Associate I earn from qualifying purchases.
Required Hardware
Temperature Sensors
If you are going to set up a thermostat, you need a reliable temperature sensor in the space you’re trying to control.
Electrical Components
- Inline Cord Switch 2 Pack
- Chanzon 100pcs UL Listed 1/4” 6.3mm Male & Female Spade
- 14 awg Silicone Electrical Wire 2 Conductor
- WAGO 221 Lever Nuts 28pc Assortment with Case
Tools
Most of this work can be done with basic electrical tools.
- Haisstronica Crimping Tool
- KNIPEX Tools 13 72 8 Forged Wire Stripper
- Wiha 30290 SoftFinish Grip ScrewDriver Set
- Klein Tools CL800 Digital Clamp Meter
- Voltage Tester with LED Display
How the Dry Contact Made This Easy
The control side of this setup was pretty straightforward. The fireplace uses a dry contact for switching, which means the Shelly 1 Gen 4 can control it without putting line voltage on the relay output. That let me treat the Shelly as nothing more than an on/off switch for the fireplace’s millivolt control circuit.
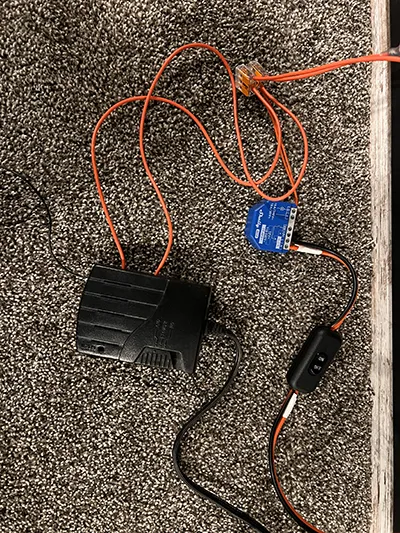
I powered the Shelly from the fireplace junction box, which gave me a clean way to add smart control without modifying anything inside the firebox. The junction box includes five terminals that use 1/4” (6.3mm) male spade connectors to supply power to accessories, making it easy to tie everything in cleanly.
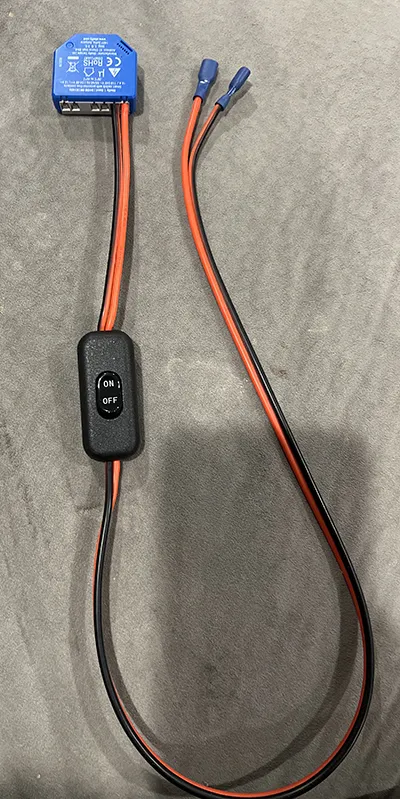
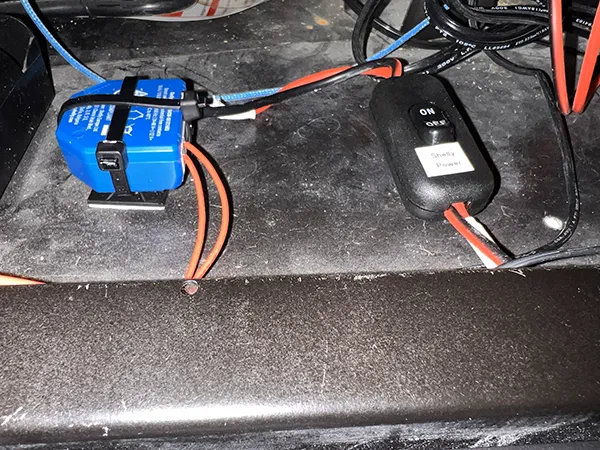
Adding a Physical Disable Switch
Any time I automate something that involves fire, I want a hard-wired way to shut it down. I added a simple toggle switch inline ahead of the Shelly. Flip it off and the Shelly can’t activate the fireplace, no matter what Home Assistant tries to do.
That physical cutoff gives me peace of mind, especially when we’re gone for a few days.
 Shelly 1 Wiring
I wrapped white electrical tape around the red wire to indicate that it was repurposed as a neutral, making it obvious that it’s no longer acting as a switched hot.
Keeping the Skytech RF Remote as a Manual Option
The Skytech receiver box is doing the same basic dry-contact switching as the Shelly. Instead of removing it, I left it wired in so the fireplace still has a simple, manual control path.
The Skytech has an on/remote/off switch. I normally leave it set to OFF, but it’s there if Home Assistant is down or if I’m testing something and want a quick way to turn the fireplace on without touching automations.
I wired the Shelly and Skytech in parallel with the fireplace’s millivolt gas valve using two three-conductor Wago 221 lever nuts. This allows either the Shelly or the Skytech to close the circuit and ignite the fireplace, without one depending on the other.
 Shelly 2 Wiring with Skytech Box
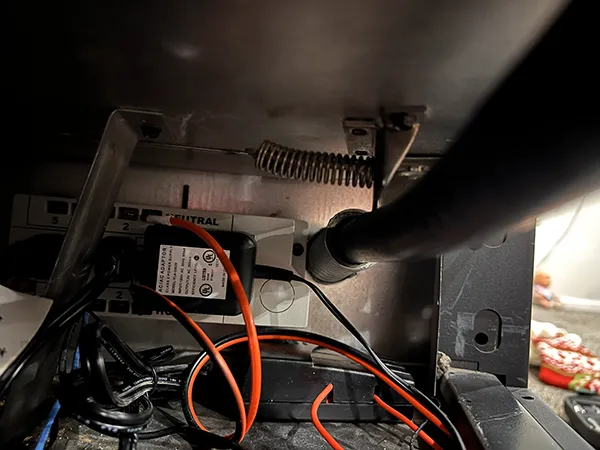
Monitoring Power with a Shelly PM Gen 3
The junction box that powers the fireplace and blower was a natural place to add a Shelly PM Gen 3. I used it as the splice point for the hot feed and added a neutral pigtail for the monitor using a two-conductor Wago 221.
This gives me real-time visibility into the blower’s power draw and makes it easy to see exactly when the fireplace components turn on and off. I also use that power data as an additional safety signal in a few Home Assistant automations.
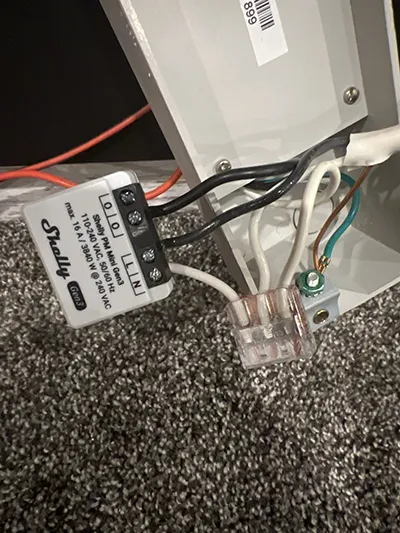 Shelly PM wired to junction box
In the photo it may look like a red wire is connected to the Shelly PM output, but that wire is actually routed behind the unit and not part of the PM connection.
 Final Install Shelly 1
 Final Install Junction Box
Two Home Assistant Thermostats for a Better Heat Curve
The fireplace is in our basement family room on the south wall, while my office sits on the north side of the family room with a 37-inch barn door that I usually leave open. The family room warms up faster than the office, so a single thermostat never gave me a comfortable balance across the whole space.
To fix that, I created two Home Assistant generic thermostats using the built-in helper tools. One thermostat uses the office temperature sensor for my work days, so I can stay comfortable at my desk without overheating the rest of the basement. The other uses the family room temperature sensor for evenings and weekends when I’m playing with the girls or watching TV.
To create a generic thermostat, I used the Helper system in Home Assistant:
- Select Settings → Devices & Services → Helpers
- Select Create Helper
- Select Generic Thermostat
The thermostat requires two things:
a temperature sensor and an actuator switch. For the family room, I used my
Airthings radon monitor as the temperature source. For the office, I used my
SwitchBot Meter Pro CO₂, which also reports temperature. I covered both devices
in my indoor air quality post. The actuator switch is the Shelly 1 Gen 4
connected to the fireplace’s dry-contact control.
I set the cold and hot tolerance to 0.5 degrees and the minimum cycle duration to 5 minutes to avoid short burner cycles. You can also set presets for Home, Away, Sleep, etc., but I didn’t configure any for this setup.
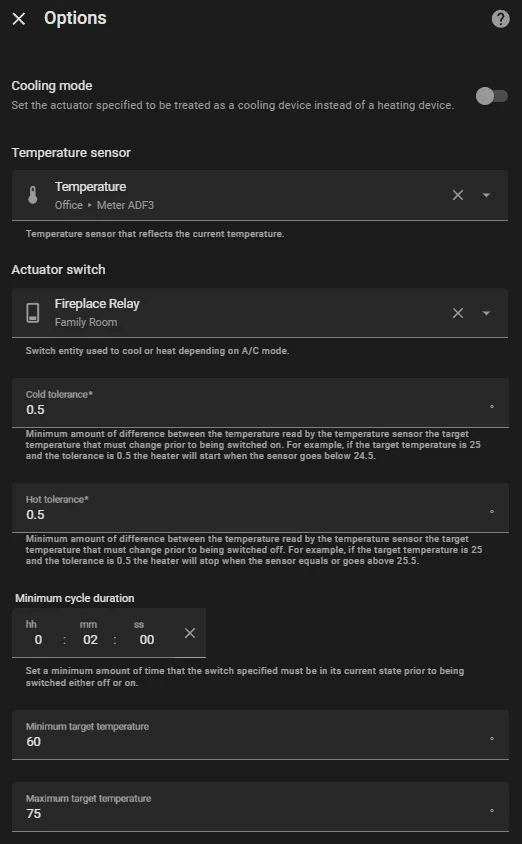 Home Assistant Thermostat Helper Options
Since both thermostats point to the same fireplace relay, I added a simple automation: when one thermostat is changed from Off to Heat, Home Assistant automatically turns the other one off if it’s active. This keeps only one thermostat in control at a time.
1
2
3
4
5
6
7
8
9
10
11
12
13
14
15
16
17
18
19
20
21
22
23
24
25
26
27
28
29
30
31
32
33
34
35
36
37
38
39
40
41
42
43
alias: Fireplace Thermostat Exclusive Control
description: Ensures only one fireplace thermostat is active at a time.
triggers:
  - trigger: state
    entity_id:
      - climate.fireplace_family_room
    from:
      - "off"
    to:
      - heat
    id: family_room
  - trigger: state
    entity_id:
      - climate.fireplace_office
    from:
      - "off"
    to:
      - heat
    id: office
conditions: []
actions:
  - choose:
      - conditions:
          - condition: trigger
            id:
              - family_room
        sequence:
          - action: climate.turn_off
            metadata: {}
            target:
              entity_id: climate.fireplace_office
            data: {}
      - conditions:
          - condition: trigger
            id:
              - office
        sequence:
          - action: climate.turn_off
            metadata: {}
            target:
              entity_id: climate.fireplace_family_room
            data: {}
mode: single
Safety Automations
Fireplace Bedtime Lockout
This automation prevents anyone from turning on the fireplace when we should be sleeping.
1
2
3
4
5
6
7
8
9
10
11
12
13
14
15
16
17
18
19
20
21
22
23
24
25
26
27
28
29
30
31
32
alias: Fireplace Bedtime Lockout
description: Prevents the fireplace from turning on between 11 PM and 6 AM.
triggers:
  - trigger: state
    entity_id:
      - switch.fireplace_relay
    to:
      - "on"
conditions:
  - condition: time
    after: "23:00:00"
    before: "06:00:00"
actions:
  - action: switch.turn_off
    metadata: {}
    target:
      entity_id: switch.fireplace_relay
    data: {}
  - action: climate.turn_off
    metadata: {}
    target:
      entity_id:
        - climate.fireplace_family_room
        - climate.fireplace_office
    data: {}
  - action: notify.send_message
    metadata: {}
    data:
      message: The fireplace is disabled between the hours of 11 PM and 6 AM.
    target:
      entity_id: notify.basement_echo_dot_speak
mode: single
Disable when Away
1
2
3
4
5
6
7
8
9
10
11
12
13
14
15
16
17
18
19
20
21
22
23
24
25
26
27
alias: "Fireplace Safety: Turn Off When Away"
description: Ensures the fireplace is turned off when I leave home.
triggers:
  - trigger: state
    entity_id:
      - person.chris
    to:
      - not_home
conditions:
  - condition: state
    entity_id: switch.fireplace_relay
    state:
      - "on"
actions:
  - action: climate.turn_off
    metadata: {}
    target:
      entity_id:
        - climate.fireplace_family_room
        - climate.fireplace_office
    data: {}
  - action: switch.turn_off
    metadata: {}
    target:
      entity_id: switch.fireplace_relay
    data: {}
mode: single
A few examples that can be done to keep the setup safe:
- Disable the fireplace if the blower hasn’t started within a set time.
- Notify me if the blower power stays above a threshold too long.
- Shut the system down if power monitoring shows abnormal usage.
- Turn off the fireplace if any CO or smoke sensors trigger.
Why I Went with Smart Control Instead of a Space Heater
My basement office is usually the coldest spot in the house. Space heaters are easy, but they aren’t cheap to run. When I compared my electric rate against the gas fireplace BTU output, the fireplace came out slightly cheaper for spot heating. I also get warmer air faster, especially with the blower running.
And if you live in North Dakota, you’re always looking for ways to make the long winter more tolerable. Smart heat in the basement is one of mine.
Even using the most conservative numbers, the gas fireplace thermostat setup pays for itself within a single North Dakota winter. The Shelly relay and PM together cost about $32. Based on my old space heater’s energy usage, the fireplace automation saves roughly $0.50–$0.70 per workday. Over 4.5 to 5 months of cold-weather workdays, that easily covers the hardware cost several.
Conclusion
I knew I had the system dialed in when I was sitting in the family room watching a football game and the fireplace turned on by itself. The thermostat dropped below the threshold, Home Assistant sent the command, and the flame ignited exactly the way it would with a normal wall switch. That’s when the project stopped feeling like an experiment and started feeling like part of the house.
The original Skytech RF remote technically had a thermostat mode, but it was always hit-or-miss. The temperature reading changed depending on where you set the remote down, and sometimes it would trigger the fireplace just because the remote was sitting too close to a window. The LCD version also ate batteries like crazy. Switching to Home Assistant thermostats fixed all of that. My temperature sensors are in consistent locations, they don’t drift, and they never die on me mid-winter.
Want to share your thoughts or ask a question?
This blog runs on coffee, YAML, and the occasional dad joke.
If you’ve found a post helpful, you can
support my work or
☕ buy me a coffee.
Curious about the gear I use? Check out my smart home and homelab setup.